Build Suggestions for Each Character Class

Greetings, heroes of Thandar! With the public release, many new players find themselves wondering what upgrades to take and later wishing that they had the option to re-spec without re-leveling. As we wait for this feature to exist, it can be helpful to know what has been proven to work. There is also a question of what order to level up your HP, skill, and ability.
This article is intended for anyone looking for some quick guides on builds and leveling progression that are tested and performed well for me over the course of the beta. These are my preferred builds so consider them more as a matter of opinion than fact. I have played hundreds of games with these and believe others in the community would vouch for them as well. They are all capable of hitting Gold, Platinum, and possibly even Diamond with enough practice and games played.
If you want to get straight to the builds, scroll all the way to the end of the article where I’ve included a snap shot of all 5 builds for easy reference.
(Update: Thanks to community member Dakaran, we now have handy visual build summaries that can be saved as images for easy reference. Be sure to click on the image in the article and it will open as full size. Awesome! Thanks, Dakaran!)
I am not suggesting that these are the only viable builds as there are many more out there. These aren’t even necessarily the optimal builds. I encourage folks to experiment and challenge assumptions to the meta. Instead these are simply five builds that are very good in my opinion that you can try as you learn the game so that you may see what you would tweak or try differently on your next character.
There are other articles dedicated to more extensively cover the strategies of how to play these builds. For this reason, I will be brief in my summaries of the builds. If you are struggling to play one of these builds, be sure to check the relevant articles for a better understanding of the game plan. Questions are always welcome in the Discord.
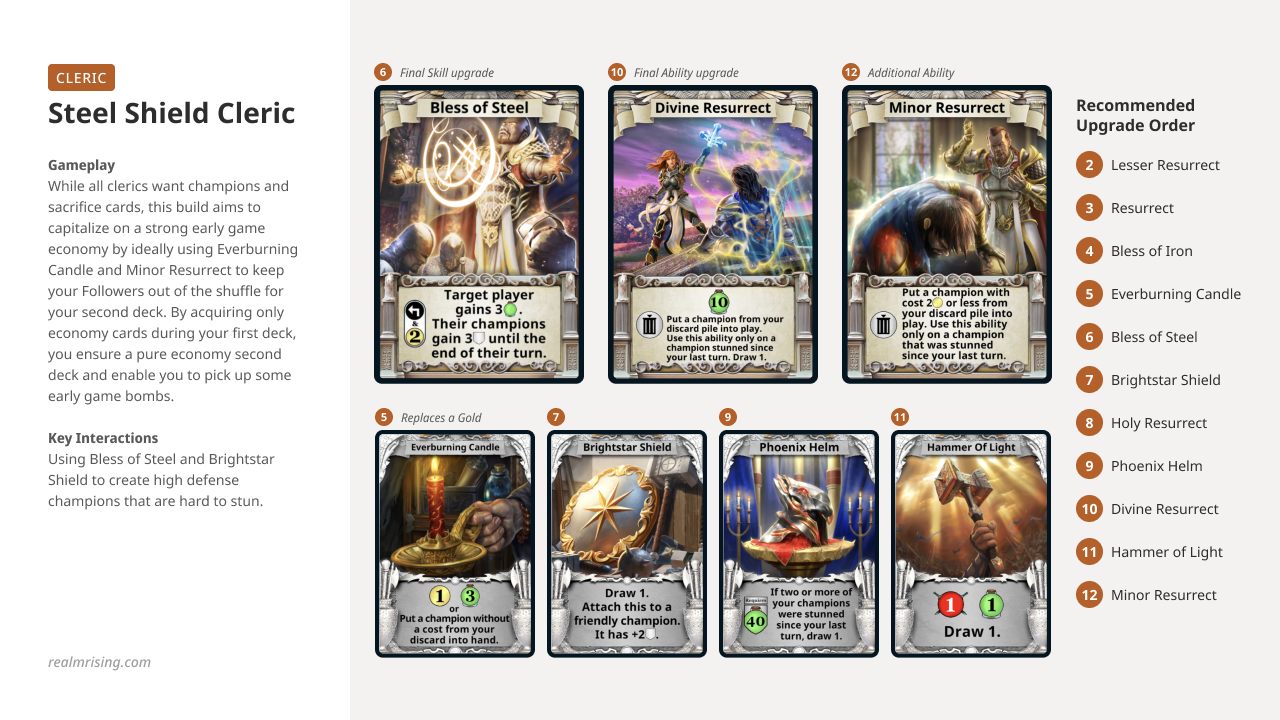
Steel Shield Cleric
| Upgrade Order |
|---|
| Level 2 - Lesser Resurrect |
| Level 3 - Resurrect |
| Level 4 - Bless of Iron |
| Level 5 - Everburning Candle |
| Level 6 - Bless of Steel |
| Level 7 - Brightstar Shield |
| Level 8 - Holy Resurrect |
| Level 9 - Phoenix Helm |
| Level 10 - Divine Resurrect |
| Level 11 - Hammer of Light |
| Level 12 - Minor Resurrect |
This cleric build wants champions and sacrifice just like any other but is built a little differently to optimize it’s potential purchasing power in the early game. You can often set up your second deck to be pure economy. This is done via Everburning Candle and your use of Minor Resurrect to keep your Followers out of your discard prior to the shuffle. Then in your second deck, you can even burn your Divine Resurrect early just for the card draw effect when you know you’ll draw the gold you need to make a game changing purchase. There’s a lot of context to consider when making this decision but Tyrannor is the sort of bomb we’re looking for here.
In terms of progression, we’re maxing out Bless right away as this greatly improves our ability to put up a champion wall. Once you have Bless of Steel, even the weak champions in the game become much more viable purchases. Next we max out Resurrect and take the path that cantrips as this provides a lot of utility. The 10 health can also be great at getting you back above the threshold for your Phoenix Helm to be active. At level 12, rather than take more health, we opt for Minor Resurrect which, as mentioned above, is used to keep your second deck thin.
Many folks run Ruinos Redeemed here and I’m not a huge fan for a handful of reasons: it gives the choice to your opponent on how to handle it which means they’ll generally always choose the option you don’t want. Having it in your starting deck means you have to draw it and will have less early economy. Our Bless ability provides enough defense and life gain that the two health off Ruinos isn’t that helpful. Brightstar shield still effectively grants you 2 health most of the time but never slows your deck down. Furthermore, the shield can stack with Bless of Steel in a relevant way that Ruinos Redeemed can’t quite do because it is so often ignored and left in play, negating it’s positive interaction with Bless. Combining Brightstar shield with Bless to bring Torgen up to 12 defense on the other hand is quite formidable.
For more in-depth information, check out our full collection of cleric content.
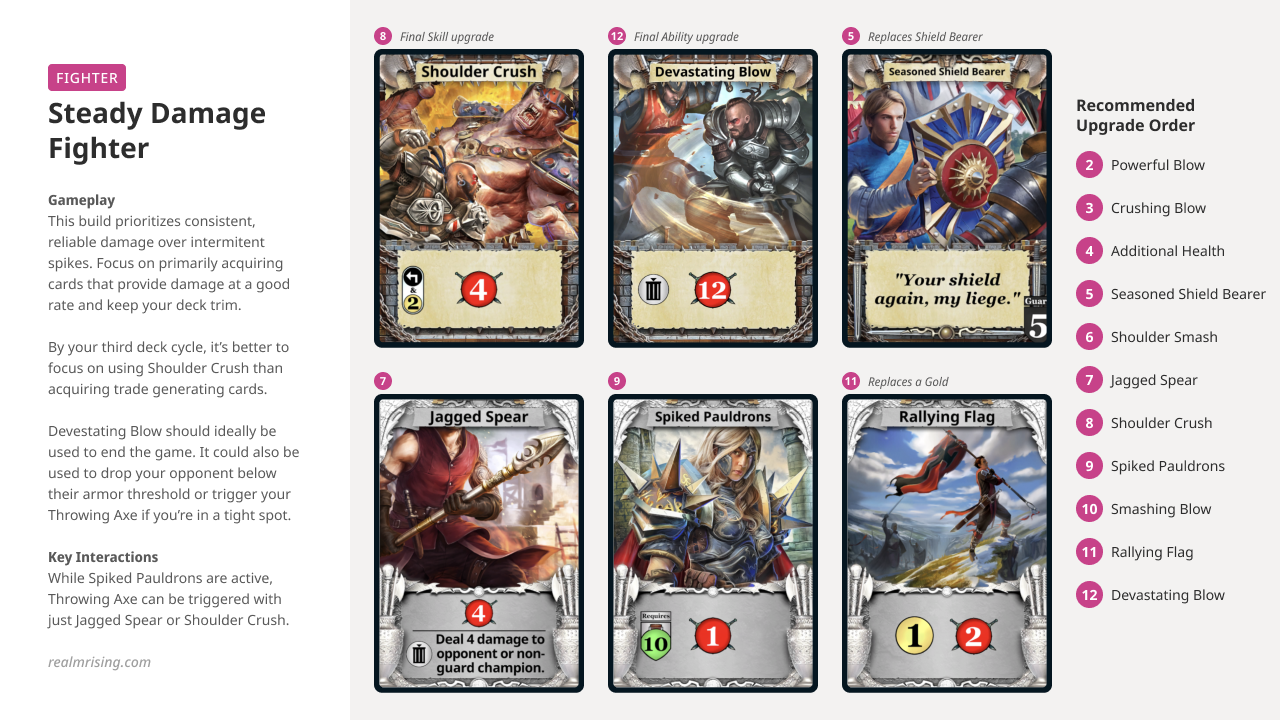
Steady Damage Fighter
| Upgrade Order |
|---|
| Level 2 - Powerful Blow |
| Level 3 - Crushing Blow |
| Level 4 - HP |
| Level 5 - Season Shield Bearer |
| Level 6 - Shoulder Smash |
| Level 7 - Jagged Spear |
| Level 8 - Should Crush |
| Level 9 - Spiked Pauldrons |
| Level 10 - Smashing Blow |
| Level 11 - Rallying Flag |
| Level 12 - Devastating Blow |
This fighter build prioritizes consistent, reliable damage over the potential spikes in damage offered by Helm of Fury and Sharpening Stone. With this build, you want to be extremely disciplined in your purchases and almost always only take cards that provide you damage at a good rate. Elven Curse, Intimidation, Dark Energy, and Close Ranks are a few stand-outs. If you are in your third deck cycle and have 2 gold, it’s usually better to get in the Shoulder Crush rather than purchase a Fire Gem. Generally you should save your Devastating Blow for one of three occasions — to trigger your Throwing Axe, knock an enemy below the threshold for their armor, or to win the game.
The progression starts with HP as this can give you an edge in the damage race at these early levels. Next we max out our skill because we only have to activate it three times in a given game to have provided more damage than we would have gotten by maximizing our ability first. (3 Shoulder Crushes and a Crushing Blow is 20 damage whereas 3 Shoulder Bashes and a Devastating Blow is only 18.) Keep your purchases tight and your deck lean and you can put up wins around turn 10-12 more often than you might think.
As a final disclaimer with this build, you are essentially dead in the water versus a skilled cleric player and will need great market and shuffle RNG to win. On the other hand, you’ve got great game against all 4 other match-ups and for that reason, I recommend this build. There was a recent tweak to the Fighter ability tree so stay tuned to see if there is a more well rounded fighter build on the horizon!
Those looking for further information can find more fighter content here.
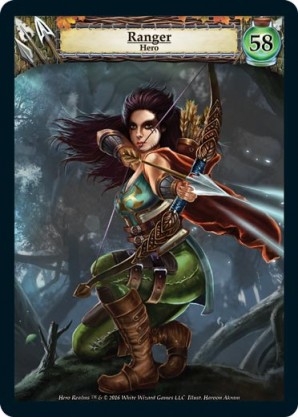
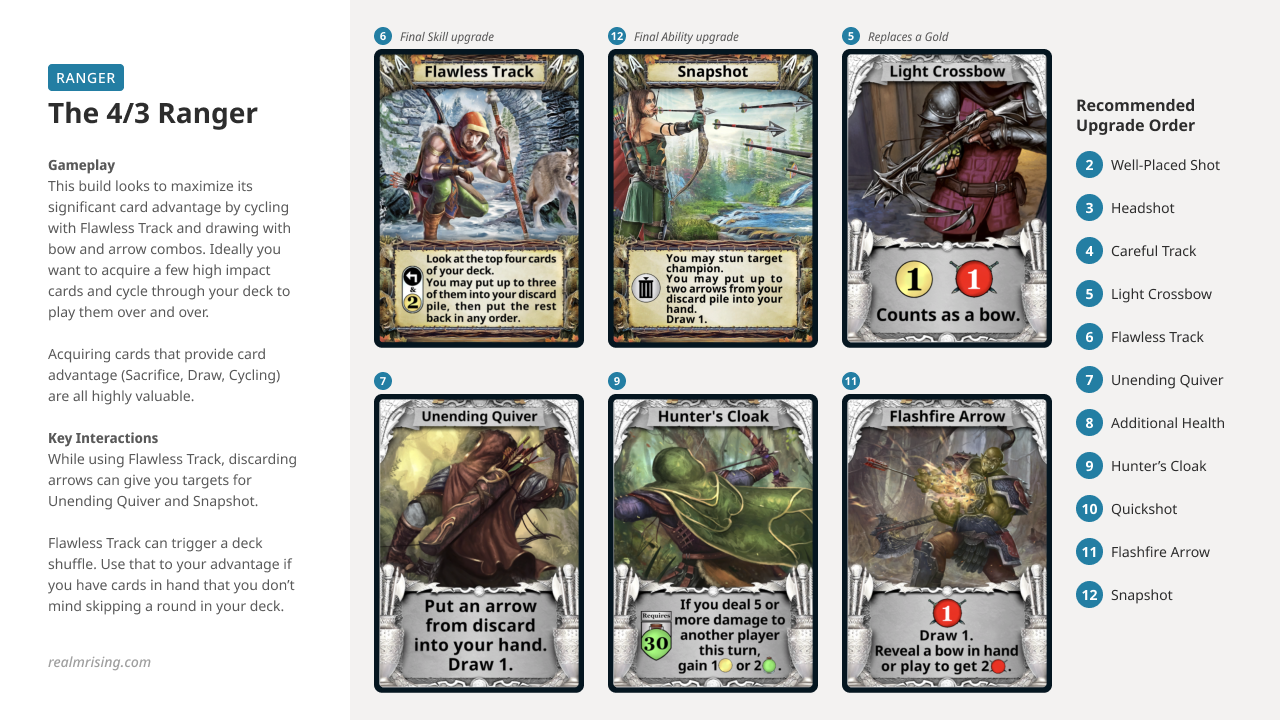
The 4/3 Ranger
| Upgrade Order |
|---|
| Level 2 - Well-Placed Shot |
| Level 3 - Headshot |
| Level 4 - Careful Track |
| Level 5 - Light Crossbow |
| Level 6 - Flawless Track |
| Level 7 - Unending Quiver |
| Level 8 - HP |
| Level 9 - Hunter's Cloak |
| Level 10 - Quickshot |
| Level 11 - Flashfire Arrow |
| Level 12 - Snapshot |
This is a 4/3 Ranger because it uses Flawless Track which digs down 4 cards and lets you discard up to 3 of them. No other class or build can cycle through its deck quite like this one. Ideally you want to make a small number of high impact purchases early and then cycle through your deck to play them over and over. Card advantage cards (Sacrifice, Draw, Cycling) are all highly valued by the Ranger. This build is extremely strong and I do not consider it to have weak match-ups, though it is certainly beatable.
When leveling your Ranger, maxing out your Track right away is going to get the power of Tracking online for you as soon as possible. From here we actually take HP as Headshot is already quite good and the buff to HP will help keep the Hunter’s Cloak usable for longer. Conveniently, we get the Cloak at the very next level. Closing out the build is Snapshot. If there is a very strong expensive card on the row early, don’t be afraid to take a turn Tracking just to get arrows into your discard so that on your next turn, you can Snapshot them to hand and take a huge turn where you end up purchasing that bomb off the row.
The ranger section is located here — be sure to check out Advanced Arrow Dynamics! 😉
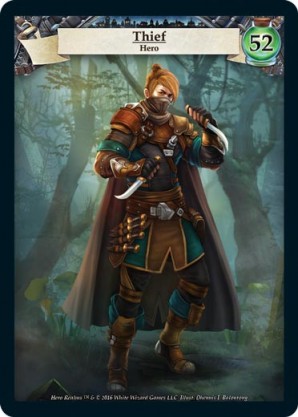
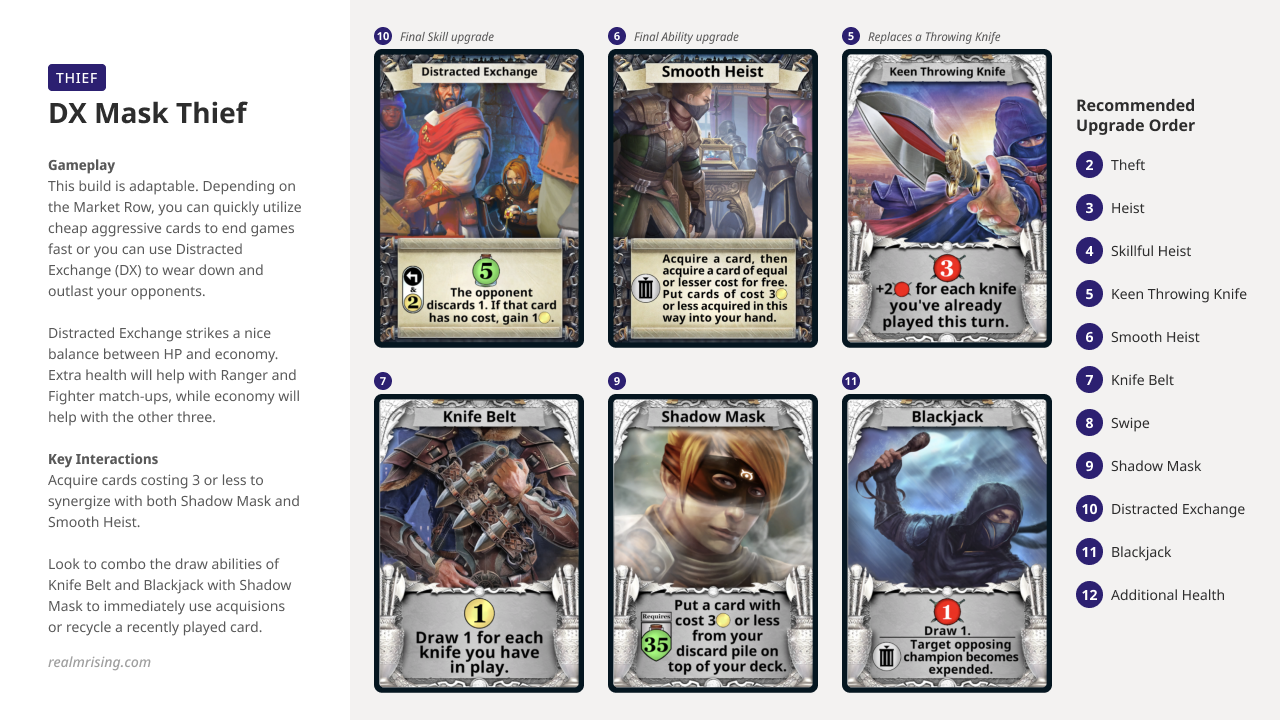
DX Mask Thief
| Upgrade Order |
|---|
| Level 2 - Theft |
| Level 3 - Heist |
| Level 4 - Skillful Heist |
| Level 5 - Keen Throwing Knife |
| Level 6 - Smooth Heist |
| Level 7 - Knife Belt |
| Level 8 - Swipe |
| Level 9 - Shadow Mask |
| Level 10 - Distracted Exchange |
| Level 11 - BlackJack |
| Level 12 - HP |
This thief build prioritizes purchasing discard, just like any other thief, but will also place a premium on cards that cost 3 or less as they can be re-used with the Shadow Mask. There is also a nice synergy here with Smooth Heist as this will often be purchasing those cheaper cards as they go to hand right away. Simply purchasing a Fire Gem and sticking it on top for your next turn is another impactful play. This thief is adaptable to any market row as you can pounce on aggressive damaging cards to close quickly or play a long game, where using your skill on every single turn will buy you the time to go over the top of your opponent.
For this thief, I like to max out my Smooth Heist right away. I think this can be the most impactful ability in the game and rushing to it will net you some easy wins. The head start it grants you will help snowball your advantage as the game progresses so try to use it earlier rather than later. We are going to max our skill next and since we end in the middle of the tree, we have two options in our path to get there. I recommend going right and choosing Swipe as the extra health will improve your Ranger and Fighter match-ups. While the economy may be better in the other three match-ups, your purchasing power is already quite strong so shoring up our weakness to aggro takes priority. Distracted Exchange (DX) strikes a nice balance between HP and economy.
Knife Belt can line up to draw a bunch of cards, and with Blackjack drawing a card as well, remember to use these in combination with your Shadow Mask. HP is taken at level 12 to continue helping with the aggro match-ups but also because the HP threshold for Shadow Mask is actually relatively high so the life boost helps it last later into the game.
I will make a quick note that for Thieves, the armor choice is perhaps more build defining than any other hero. I do believe Boots is quite viable and in fact prefer it myself. However, the Mask build is arguably just as strong and likely more friendly towards newer players to which this guide is directed.
Follow this link to learn more about the class. Strategy deep-dive forthcoming!
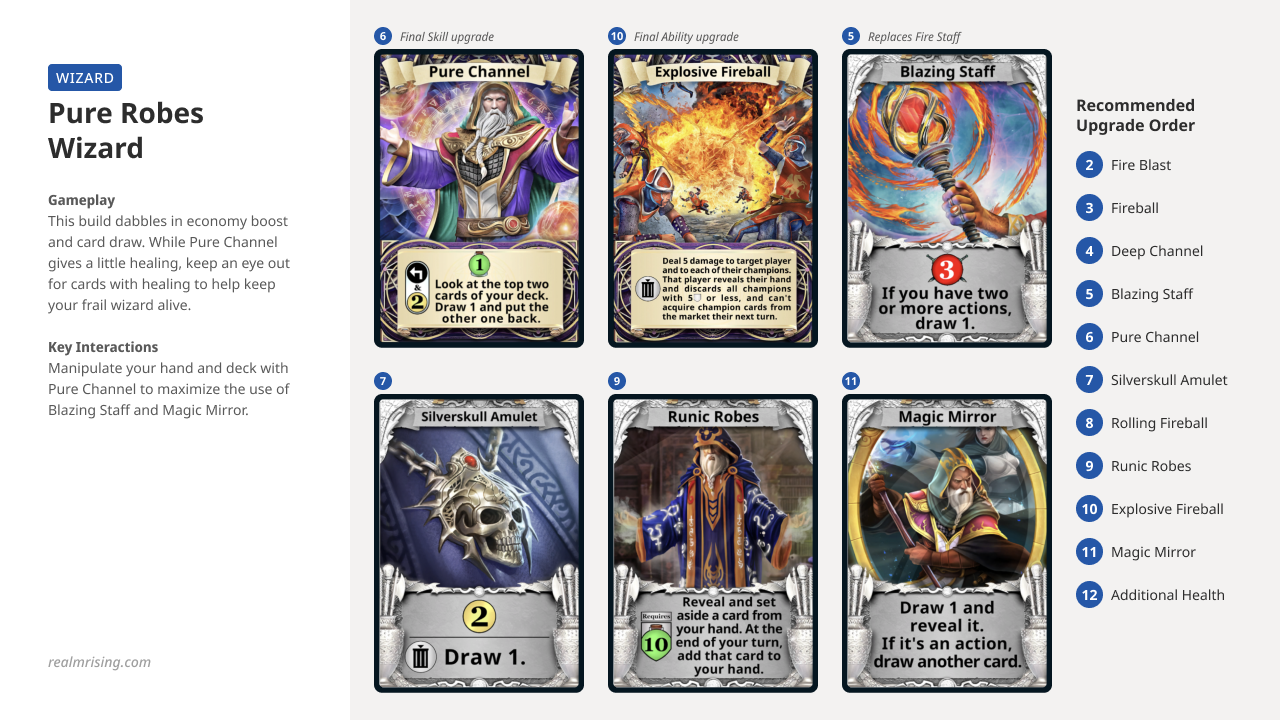
Pure Robes Wizard
| Upgrade Order |
|---|
| Level 2 - Fire Blast |
| Level 3 - Fireball |
| Level 4 - Deep Channel |
| Level 5 - Blazing Staff |
| Level 6 - Pure Channel |
| Level 7 - Silverskull Amulet |
| Level 8 - Rolling Fireball |
| Level 9 - Runic Robes |
| Level 10 - Explosive Fireball |
| Level 11 - Magic Mirror |
| Level 12 - HP |
This wizard dabbles a bit all over the board — you get an econ boost in the amazing Silverskull Amulet, more card draw combo in Magic Mirror, and a nice balance of life and scry/draw with Pure Channel. Imperial cards are your friend as you are a frail wizard. While the build incentives purchasing actions, don’t avoid good champions if that’s what the row presents. They also soak up damage that your opponent would otherwise be sending your way so they become even more important against an aggressive opponent.
What I like about this build is that it falls right in between the life-gain heavy Spellcaster Gloves + Serene Channel build and the combo-centric Arcane Wand + Soul Channel Wizard. You get a lot of the benefits of both as you can still line up great combo turns, but you also get the early economy and a far less painful activation of your skill. I like Pure Channel over Serene as that slight scry before the draw makes it much easier to trigger Blazing Staff or Magic Mirror as well as pair up faction abilities on your cards. It’s also a little better at flipping your deck to take out the trash.
Before discussing the progression, I’ll throw in a disclaimer. The growing pains of leveling may be tough. While the build really improves as it goes, most players believe wizard is the weakest overall in the level 12 meta, so any victories will likely feel well earned. That said, a winning record with the wizard is quite possible in the hands of a skilled player. I like maxing out Channel here first so that we get the benefit of digging two cards down without having to pay any life. Next we max out Fireball because there is a lot of utility in locking out the market row and if timed correctly can really throw off your opponent’s momentum and trajectory in the game. HP is taken over more damage at level 12 to help beef up our small pool of hit points.
Click here for the Wizard Class Overview and click here for the in-depth guide.
May fortune favor you in your PvP journey!
For quick reference, I am including a table of all 5 builds below. Thanks for reading! Let me know what you think over on the Realms Rising Discord Server! Do you have a different build entirely that you’d recommend? Is there something you’d tweak to a particular build? Are you having success with one of these builds? Or maybe you’re struggling. Whatever it may be, I want to hear about it. See you there, heroes of the realm!
Title: Five Builds to Get Started in PvP
Category: Cleric
Tags:
Published on: June 27, 2022
Hey everybody, DblDubz here. I love the Realms Rising community and have an absolute blast playing in the community organized events. Even if it's just a little bragging rights, playing with something on the line against people you know, just makes it that much more exciting to me! That's part of why talking strategy and working together to optimize our play is something I love doing.
A few other facts about me -- I come from a competitive Magic: the Gathering background and have played fewer than 50 games of Star Realms! I'm also married and have a one and a half year old son, both of whom I love spending time with.
Chat me up on the Discord server or send me a challenge in game any time!