Many aspiring magic users have struggled along the risky, yet rewarding path of the wizard. This guide is meant to help players who want to learn more about the mystical ways of the wizard by exploring some of the advanced wizard strategies and play styles. Treasure and ability upgrades beyond Level 12 will also be described in this article (and kept up to date as the digital game develops).
For beginning players who are just starting to pilot the wizard, start out with this introductory article that covers wizards basics: upgrade choices, build order, matchups, and general strategies. After reading that article, proceed to further discussion of some of the more advanced concepts in this guide.
But enough introductory banter! Let’s jump into things by starting with some specific wizard builds and play styles.

An unfortunate group of champions find themselves in the midst of a Searing Fireball
Common Wizard Builds and Play Styles

The wizard is one of the most versatile character classes in the game, so make sure to match your play style with your load out to maximize your efficiency. The wizard operates on a very fine line, and you need to maximize every opportunity you come across when piloting. This includes the build choices you make when leveling up your wizard.
While there are a variety of builds, upgrade combinations, and playstyles that can be both fun to play and (relatively) successful, for the sake of levity this guide will focus on the 3 main wizard archetypes: the Pure Wizard, the Soul Wizard, and the Serene Wizard (often fondly referred to as “Shizzard”). You will notice that some of the main upgrade components are actually quite similar for each build (especially the Silverskull Amulet), how each build actually plays differs quite drastically.
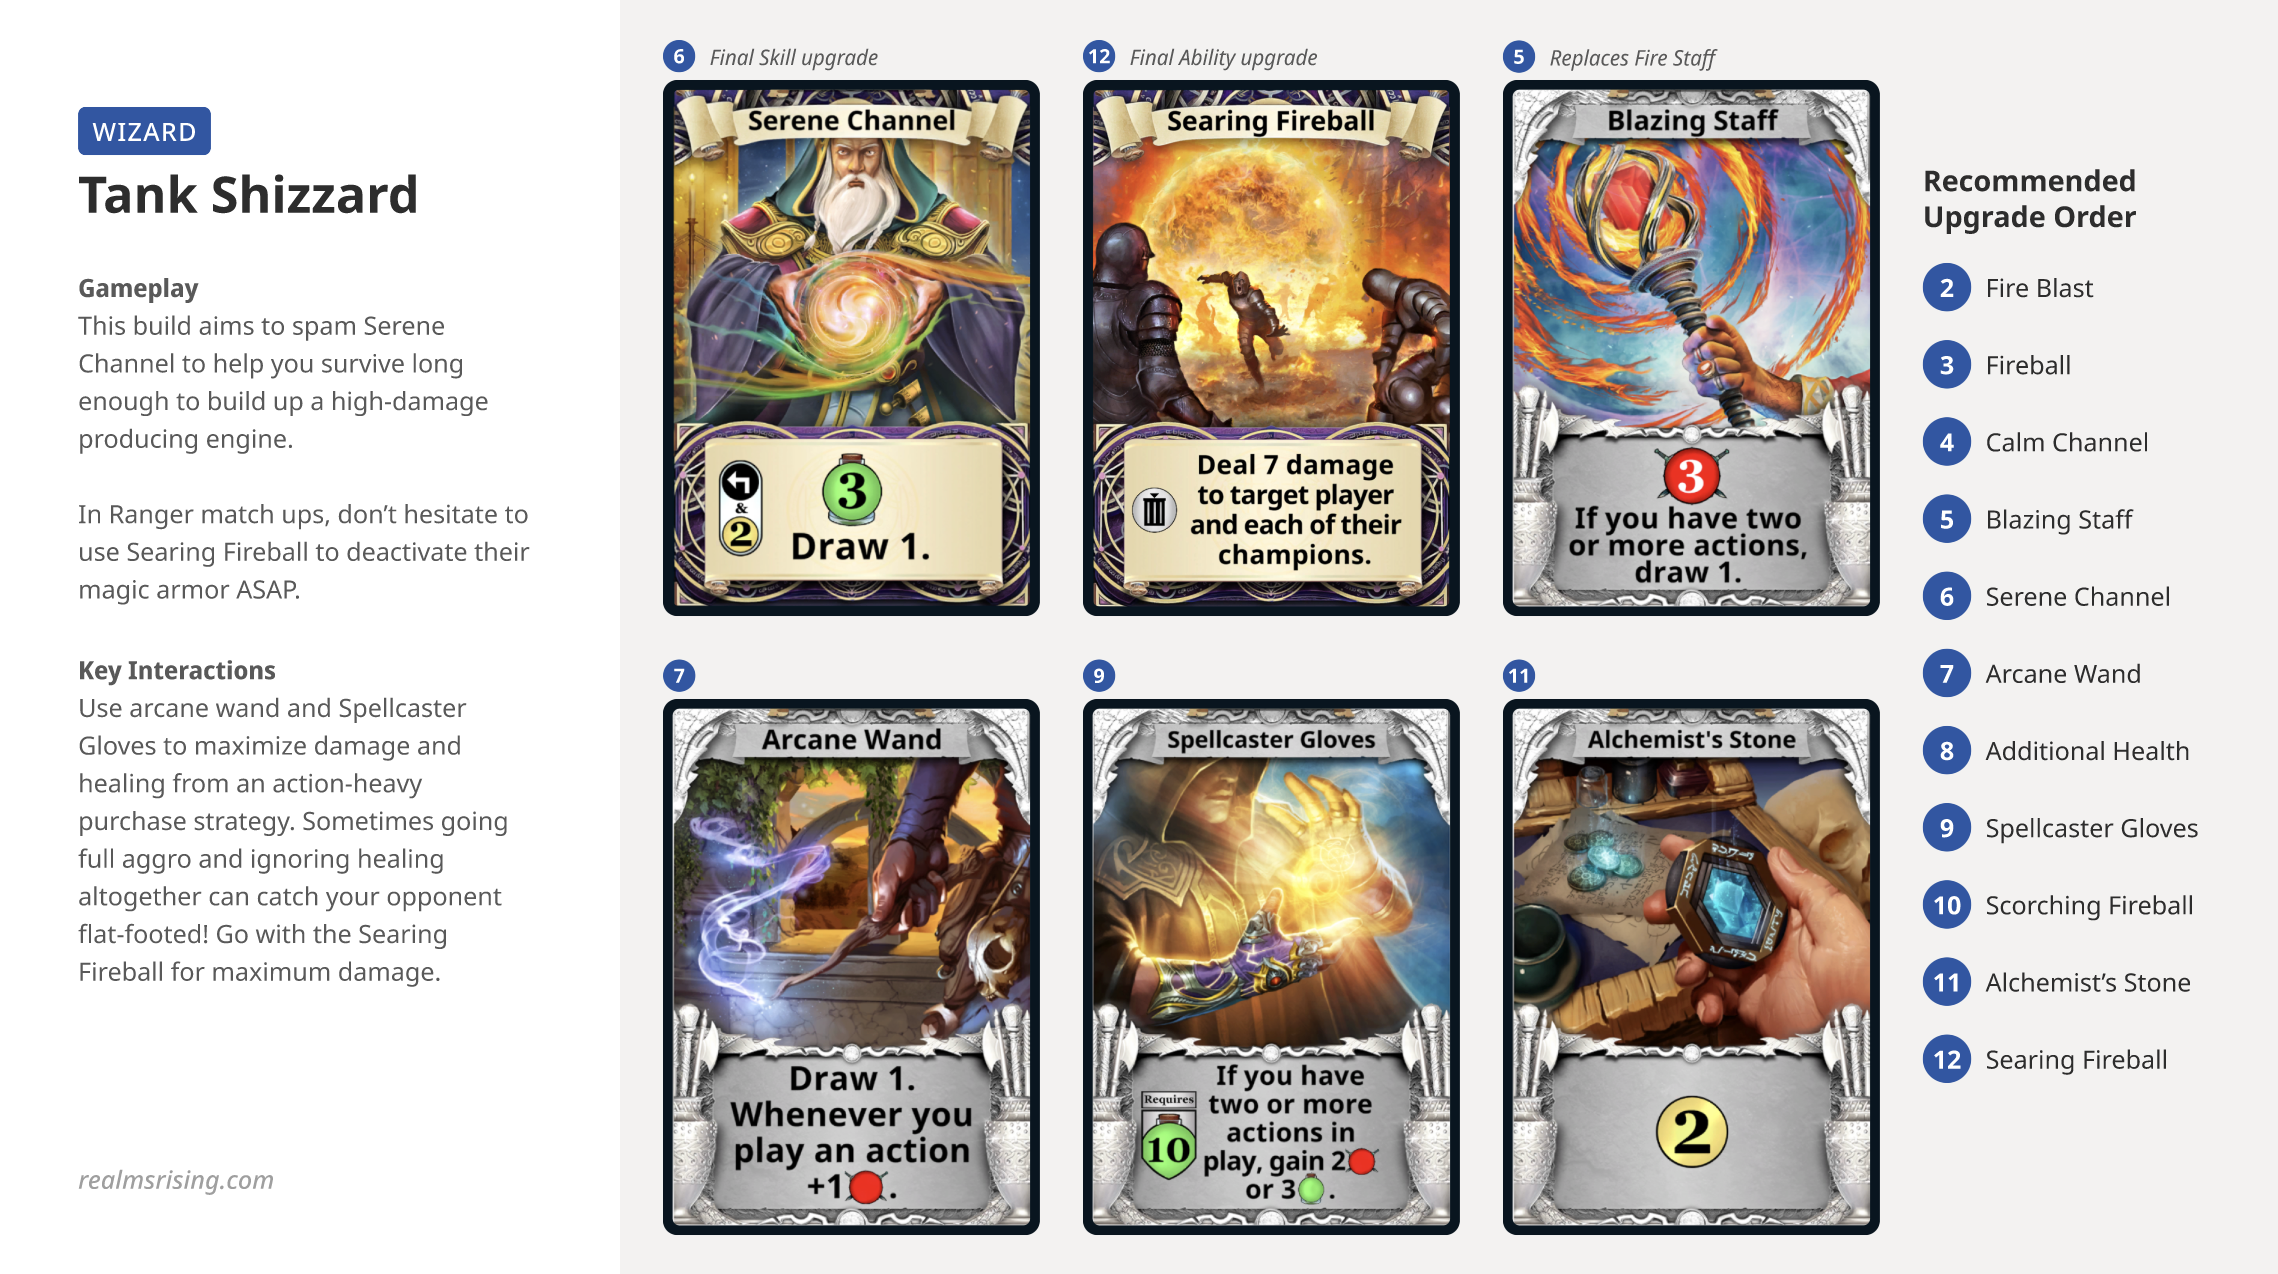
The "Shizzard"
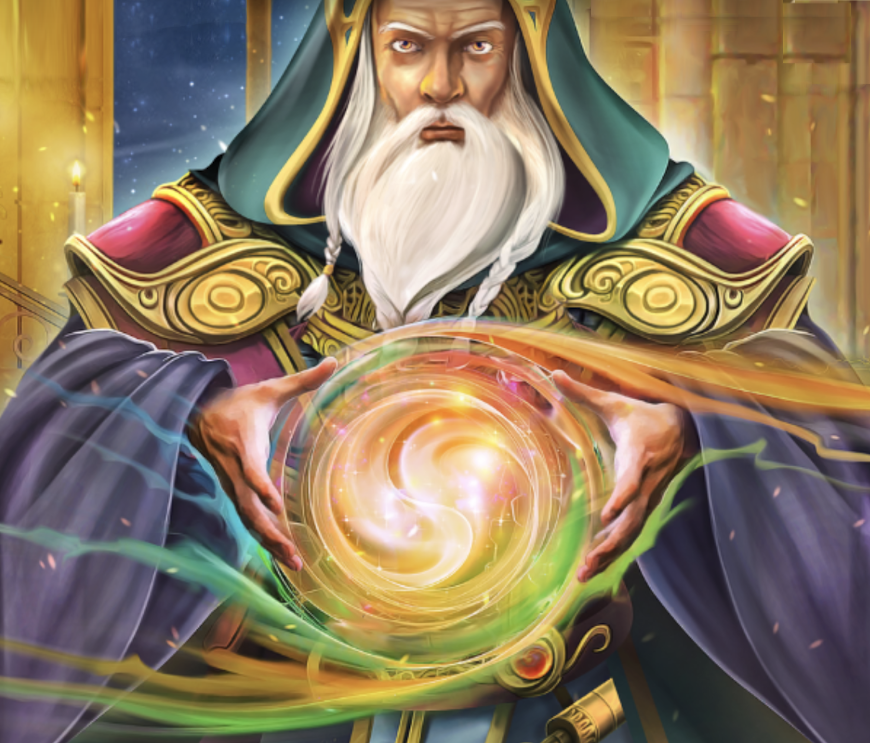
Although I have been known to speak unfavorably of the Serene Wizard’s (henceforth referred to as the “Shizzard”) one-dimensional play style and over-reliance on spam healing, it is an undoubtedly effective build. This short animated gif gives a good introduction to the Shizzard:
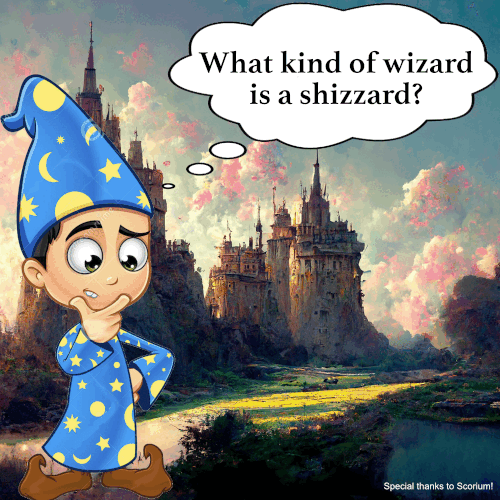
As the lovely nursery rhyme above points out, the Shizzard basically focuses their play style on spamming the serene channel as much as possible to slowly churn your deck while also keeping your HPs up. This playstyle fortifies the wizard’s greatest weak point: low starting health. While spam-channeling is indeed a common feature across all wizard builds, the serene channel is unique in that it sacrifices all scrying capabilities for just a single vanilla draw, taking a lot of the decision-making and deck manipulation out of the equation — which is what makes the wizard so fun in the first place!
Although the Serene Channel does not scry, the extra healing and steady draw make this wizard build more consistent across all matchups than most other wizard types. If you can play with principle and stick to channeling when possible, it will give the wizard a fighting chance in unfavorable matchups, like vs. Ranger or Fighter. As you will need to rely on your channeling, extra economy from the Silverskull Amulet and Alchemist Stone come in handy with this build.
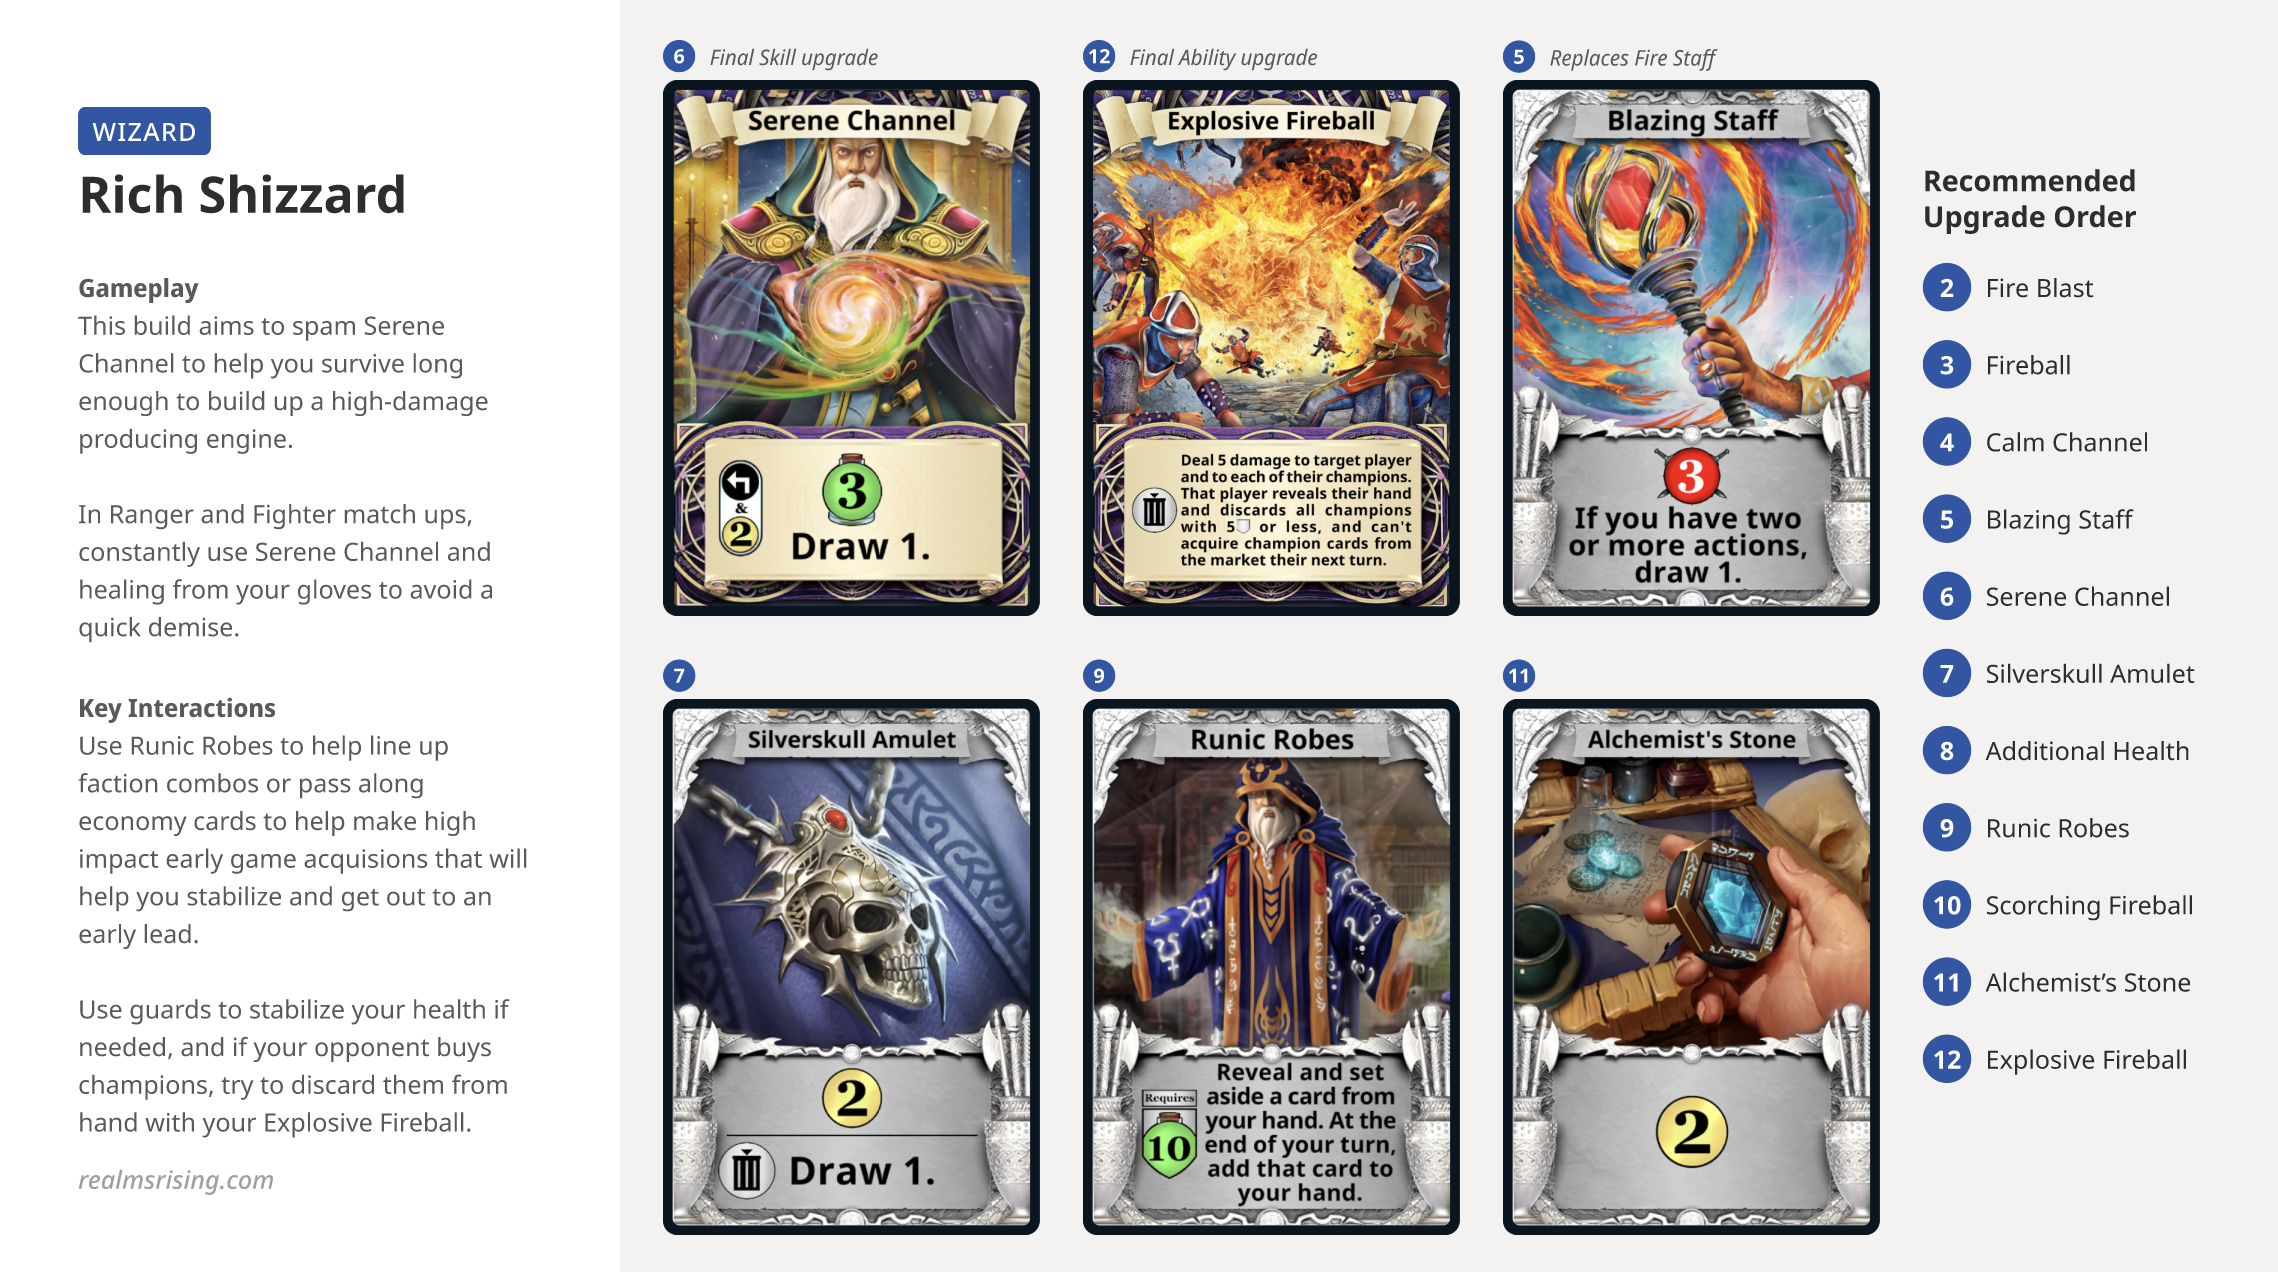
The Shizzard typically has two configurations: the Rich Shizzard and the Tank Shizzard. Choose the Runic Robes armor upgrade for more flexibility with setting up combos and economy banking (see the Rich Shizzard below for details), or go with the Spellcaster Gloves and Arcane Wand for maximum HP tanking and/or aggro-bulldozing (see Tank Shizzard below for details).
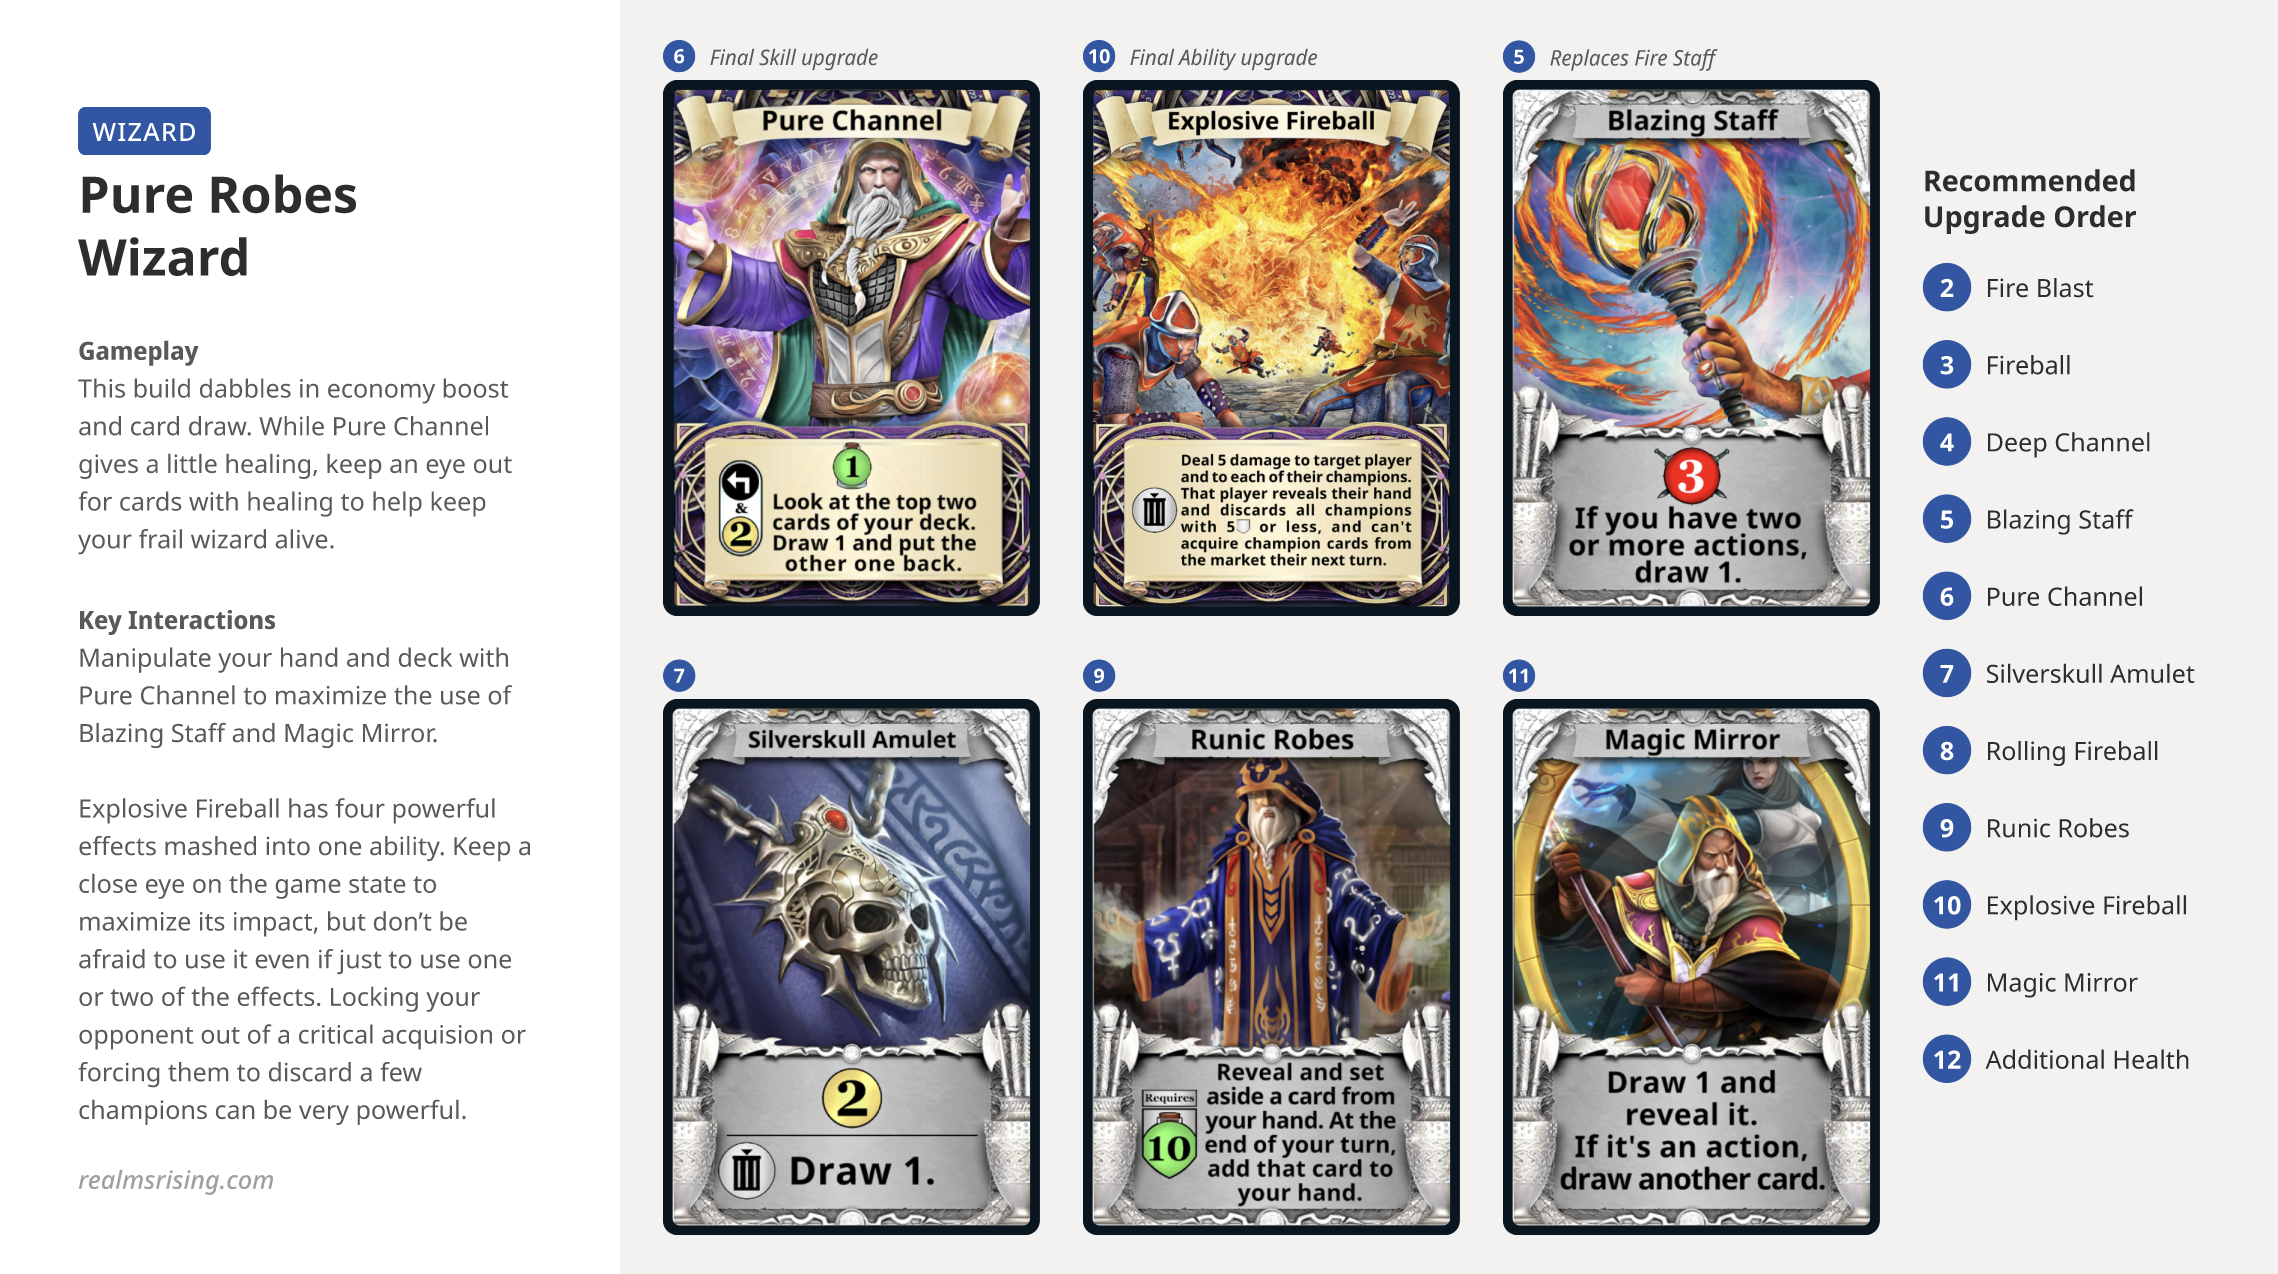
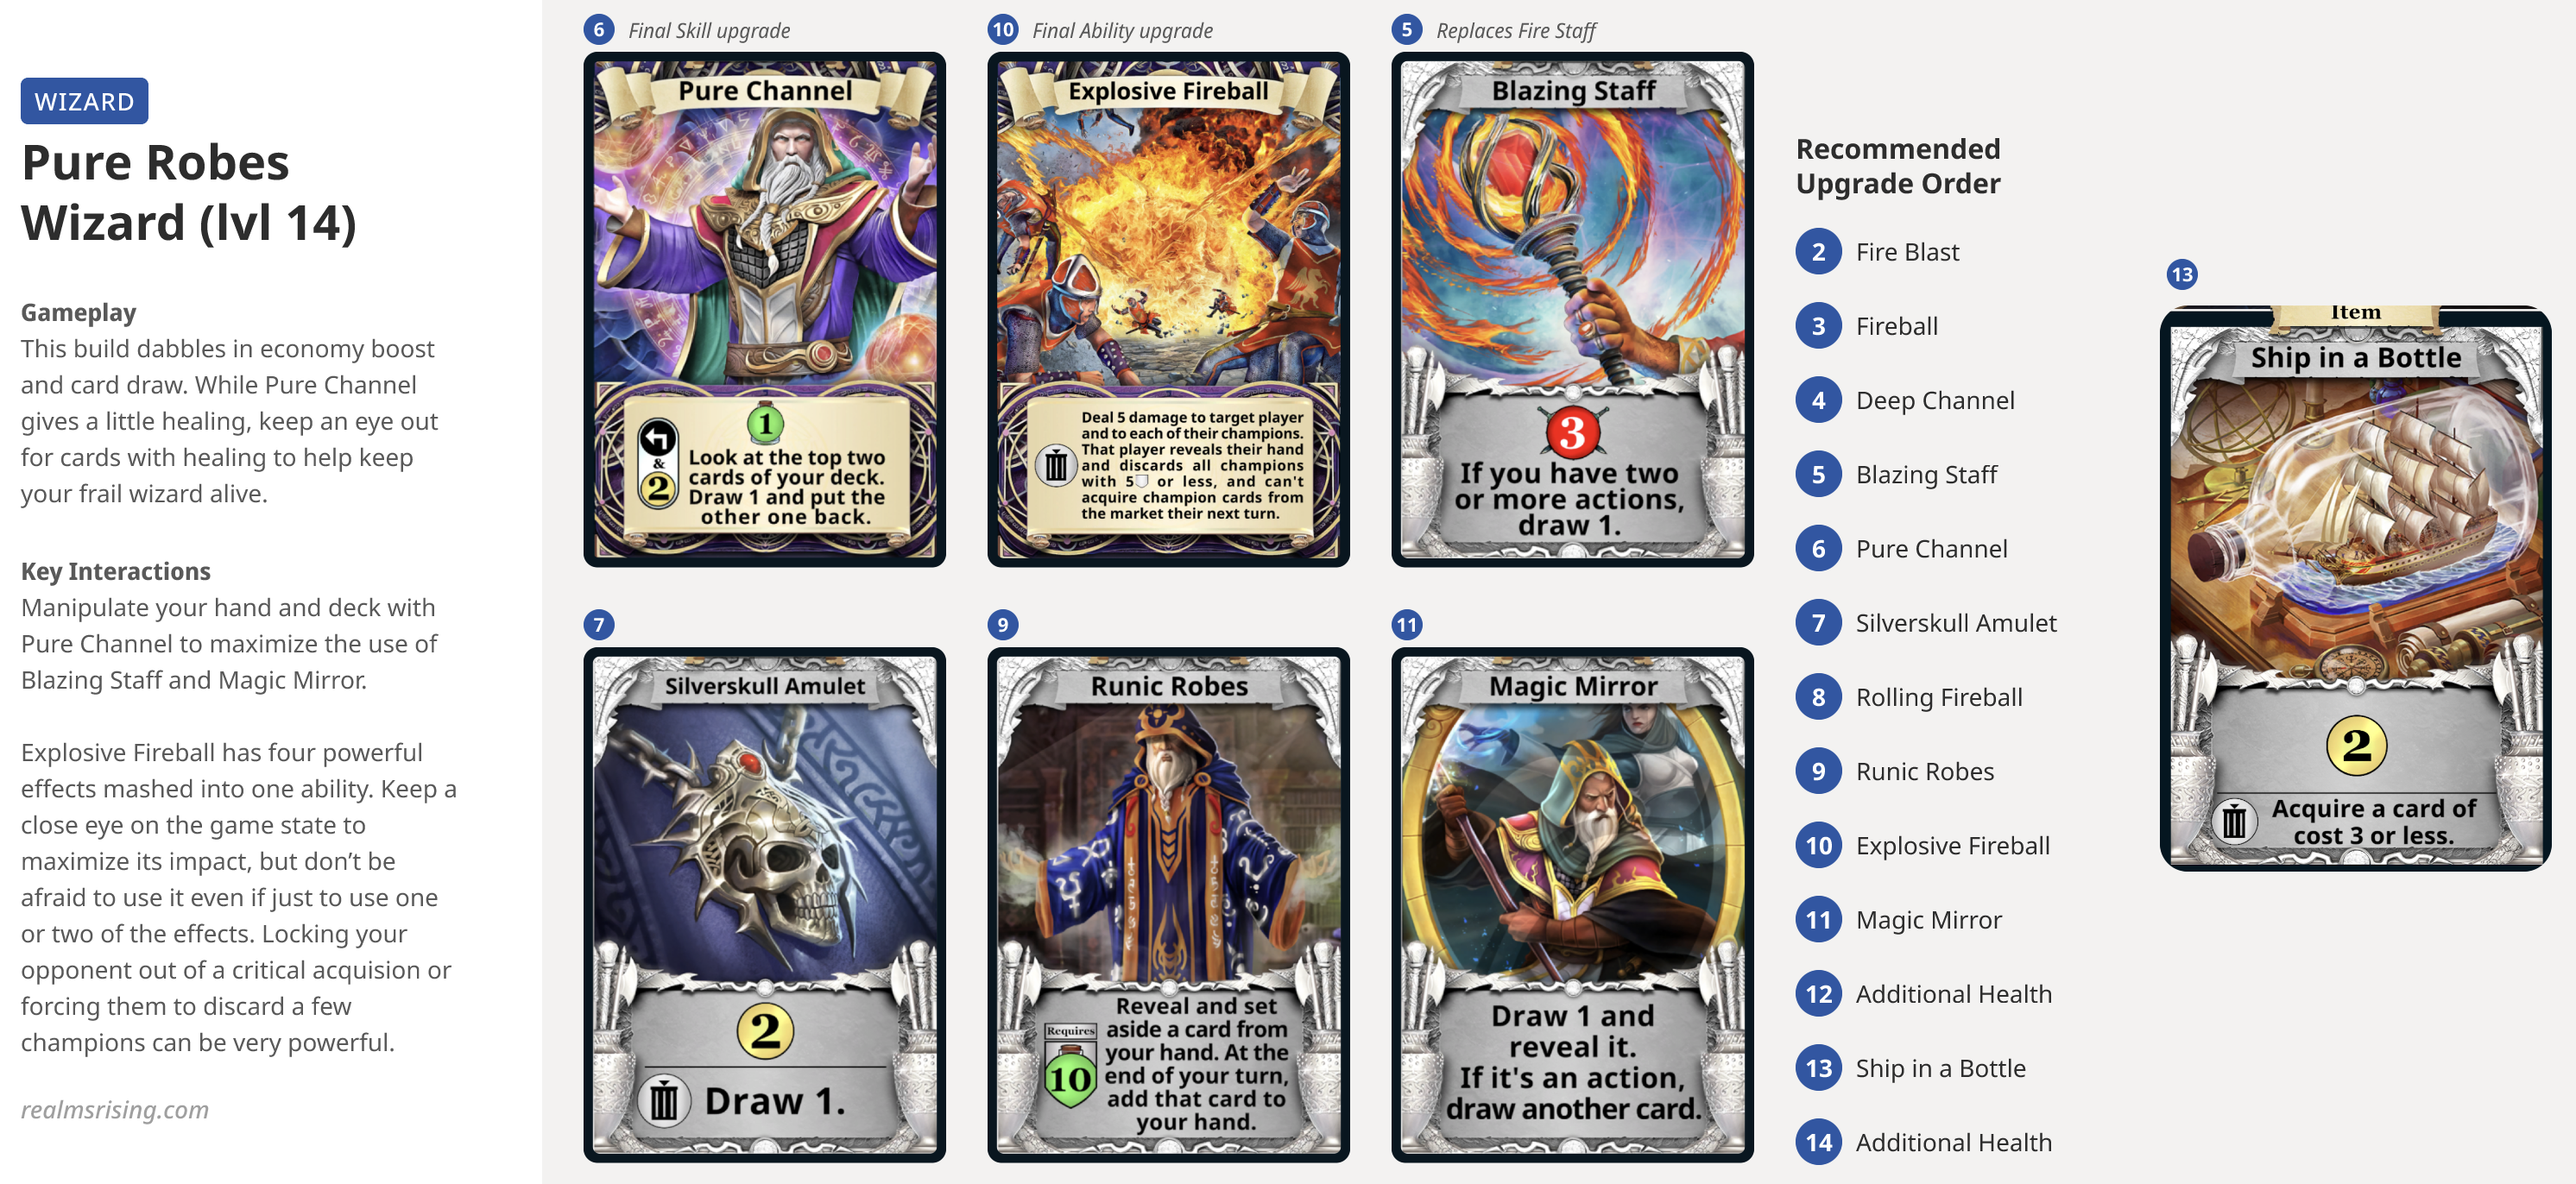
Pure Robes Wizard

The Pure Robes wizard is the wizard as he was meant to be: A scrying magician who reorders cards before drawing them, and utilizes the Runic Robes to line up factions and shape reshuffles to maximize your chances for lining up faction abilities, big Econ, and devastating combinations.
While the Pure Robes Wizard excels in scrying and deck manipulation, he lacks resiliency, as the Pure Channel only awards a single hit point with each use. This means that the Pure Robes Wizard has to use his guile and careful planning to survive — always keep a close eye on your health and plan well ahead of time to avoid an untimely demise!
As with all wizard builds, the Pure Robes Wizard likes to channel, and channel frequently. Play with principle, and channel when you can. But also think about when not to channel, and how to use your scry/channel to shape the way your cards shuffle together and subsequently increase the chances for lining up for maximized combinations.

To channel, or not to channel?
One of the key concepts behind piloting the Pure Robes Wizard (or Soul Channel Wizard) is knowing when, and perhaps even more importantly, when not to channel. It is true that you want to channel early, and channel often, but there will often be times when the sequencing of your channel is extremely important. There will be other times when you will want to forego channeling altogether. Let’s take a closer look at some of the factors that can influence the benefit (or harm) of channeling.

Cycling/healing & purchasing cards
One of the main benefits of persistent channeling is that you cycle through your deck faster, and if you survive long enough, get a chance to play the cards in your deck more often than your opponent, which hopefully contributes to a victory. With the Pure Channel, the wizard also gets +1hp with each use (for up to once per turn through level 14), which although not much, can make a difference between life and death. If you need to reach for a card in your draw pile, speed up your next reshuffle, or actually cause your next reshuffle, then think about channeling! We’ll talk more about shaping reshuffles below, but first, let’s look at one good reason not to channel: purchasing cards from the market row.
Frantically cycling through your deck is not going to do you any good unless you have some good cards in your deck to help you carry out your strategy. If the wizard does not get off to a quick start to get their deck engine running, and start generating damage, draw, and healing, aggro opponents can often take advantage of the flat-footed start and kill you before you know what hits you.
Make sure you can purchase a card from the market and get something into your first reshuffle that will help with your game plan. If you are facing an aggro opponent, prioritize any and all healing cards and guards that can prolong the game. If you are facing a longer game vs. a cleric or perhaps a thief, then you can focus on building up economy and/or sacrifice cards to take advantage of the wizard’s natural draw and faction setups. If you can purchase a big card before your next reshuffle, then great! When possible, try to avoid triggering reshuffles before you purchase big or impactful cards, as anything you buy will go to your discard and not see play until the next time you shuffle your deck.

Set up deck shapes/reshuffles
Using your scry and draw to set up your next hand, or to force a reshuffle and shape your next draw deck is perhaps the most satisfying part of piloting the wizard. With a lucky starting hand and proper sequencing (and a little help from the Silverskull Amulet’s sacrifice/draw ability), the wizard can buy a few high value cards from the market row and force a reshuffle on their second turn, shaping a draw deck densely populated with good cards, and catapulting them to a quick advantage that can set the tone and pace for victory.
In the midgame, a clever wizard will pay close attention to their draw and discard piles, and pounce at the chance to force a reshuffle that will “freeze out” unwanted cards while concentrating their next draw deck with cards that have a high chance of triggering factions and combinations. Conversely, a wise wizard will avoid triggering a reshuffle if it will prevent their powerful cards in play for the current turn from being reshuffled into the next draw pile.
In late game, a calculating (or sometimes desperate) wizard will see lethal damage in potential reach, and force a suboptimal reshuffle as long as they have a good chance at hitting their target.
In short, while it is usually a good idea to use your channel, carefully think about when to time it. I highly recommend you read Darklighter’s excellent article on the Art of the Reshuffle to level up your game, as this concept applies to other characters as well!

Piloting the wizard can use up a lot of brain power
Setting up combos/next turn
The Pure Channel (or Soul Channel) can also offer good opportunities to “punt” on the current turn, or set aside one (or two with Soul Channel) of your scried cards for next turn, where it will have a chance of trigger its faction, hit a critical economy threshold, or add damage to take out a pesky champion. When coupled with the Runic Robes, the Pure Channel offers the wizard amazing flexibility with how they plan their future turns and set up different combos.
While it may be tempting to draw the sacrifice card and use it on one of the gold cards in your hand this turn, it might be even more beneficial to save that sacrifice card until next turn, when you’ll have gold targets in your discard pile to use it on. While it might be tempting to draw that Taxation for the 2 gold to buy a Fire Gem with on this turn, it might be a better idea to stash the Taxation in your Robes or scry back to the top of your deck to try and faction the 6 health with another imperial card in your draw deck next turn.
Always look for ways to shuffle your cards via your Robes and scry abiltities to set up turns that will maximize your faction, draw, econ, and damage combinations. See the build sheet below for how to construct your Pure Robes Wizard.
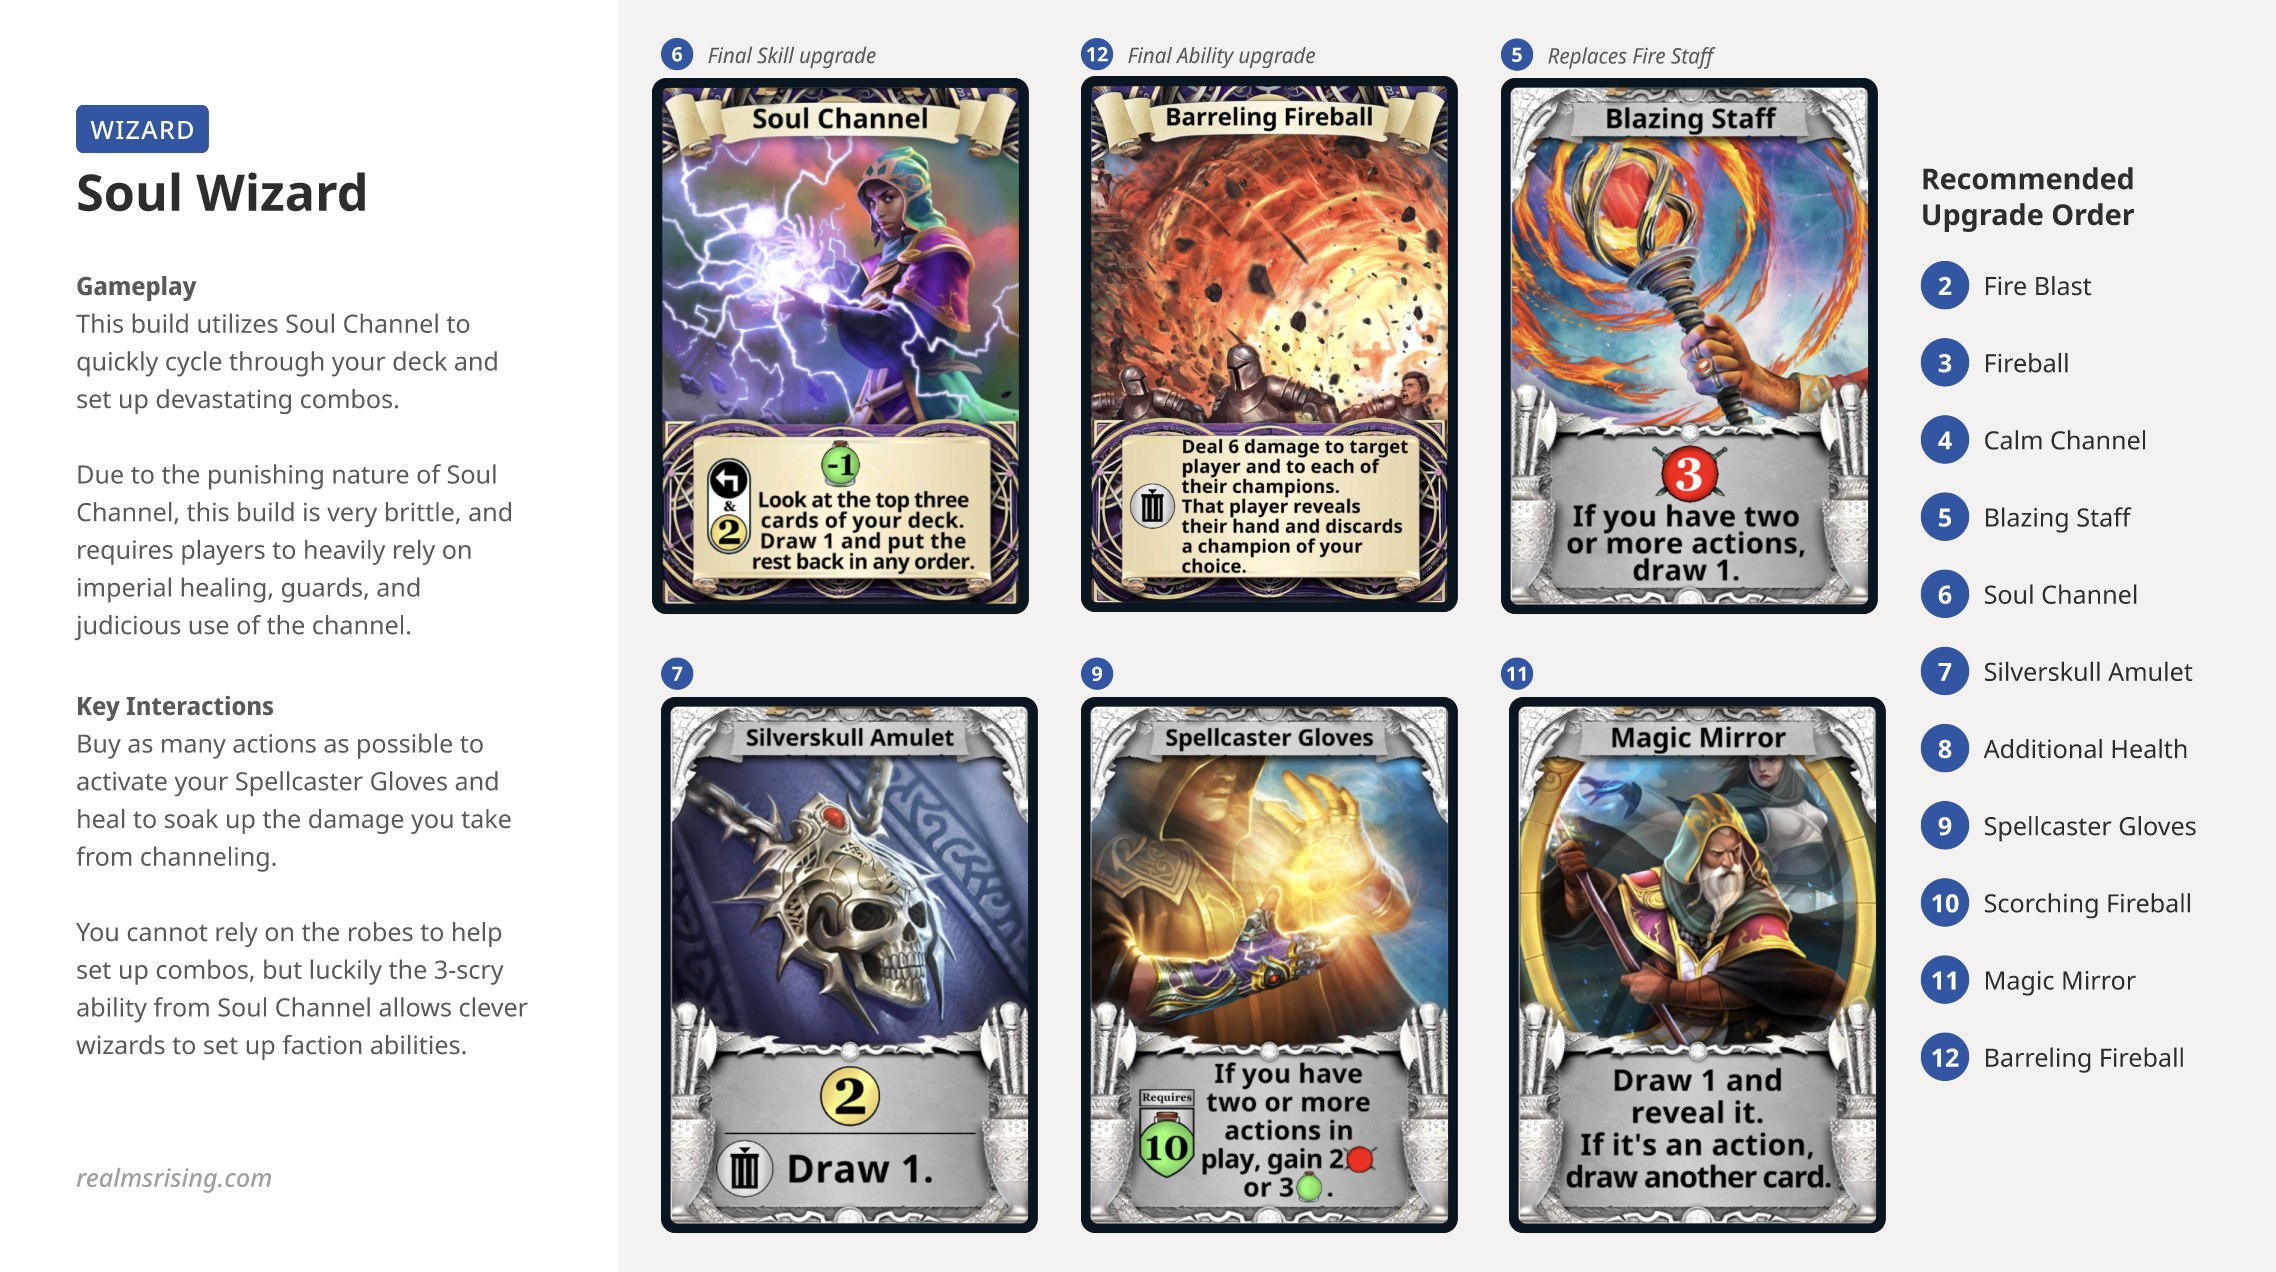
Soul Gloves Wizard

The Soul Gloves Wizard is the daredevil of the group: He uses the powerful Soul Channel that can scry THREE cards deep into your draw deck, which allows for some amazing combo set ups and a long reach when digging for cards. Unfortunately, the Soul Channel also hits the wizard for 1 damage with each use, which can add up over the course of a game.
This particular build benefits greatly from the Spellcaster Gloves, which bolster the wizard’s low hit points. Although you will lose out on the flexibility offered to you by the Runic Robes, the extra scry you get from Soul Channel will compensate, and help to quickly cycle through your deck, reach for key cards to make big purchases, or set off combos. If you can luck out with a market flush with actions that can keep your Gloves activated, then victory could be within reach!
For your opening, use Soul Channel to line up your Amulet, Alchemist stone, and/or Ship in a Bottle to guarantee a massive windfall of economy to help jumpstart your deck. If you are feeling really frisky, forego the Spellcaster Gloves for the Robes, and press your luck to see if you can find enough healing and/or guards to keep you alive long enough for your deck engine to come online.

Advanced Fireballing
They say a wizard’s fireball is his best friend (although a certain Cat Familiar may disagree!) As with many aspects of piloting the wizard, maintaining keen situational awareness for when to drop your fireball is often key to securing victory.
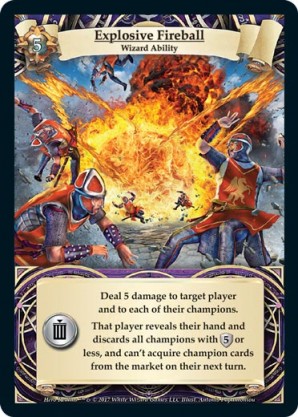
Unless you are running an aggro wizard, I highly recommend either the Explosive Fireball or Barreling Fireball, mainly for the various situations that they can be used in.
When choosing an Explosive Fireball loadout, keeping an eye out for potential Market locks is always good, but discarding multiple champion from your opponent’s hand is even better. If your opponent is foolish enough to buy multiple champions of 5 or less cost, wait for the opportune time when you can catch them with a handful of champions, then drink their tears like sweet champagne as you force them to discard them all with your fireball!
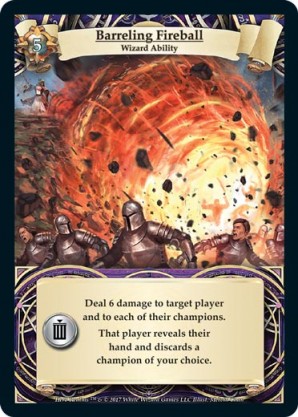
The Barreling Fireball is another great option for wizards, and can actually act as a deterrent to your opponent buying big champions. Never use your Barreling Fireball too early, nor too late, but precisely when you mean to: for discarding!
Of course, if you are in an emergency situation and have no other way to dispose of a nasty champion who is going to make your life miserable, then don’t hesitate to burn your fireball. Just always try to prioritize it for offensive use to disrupt your opponent’s plans, rather reactively to take out opponent champions (if you can avoid it).
Level 14 Wizarding
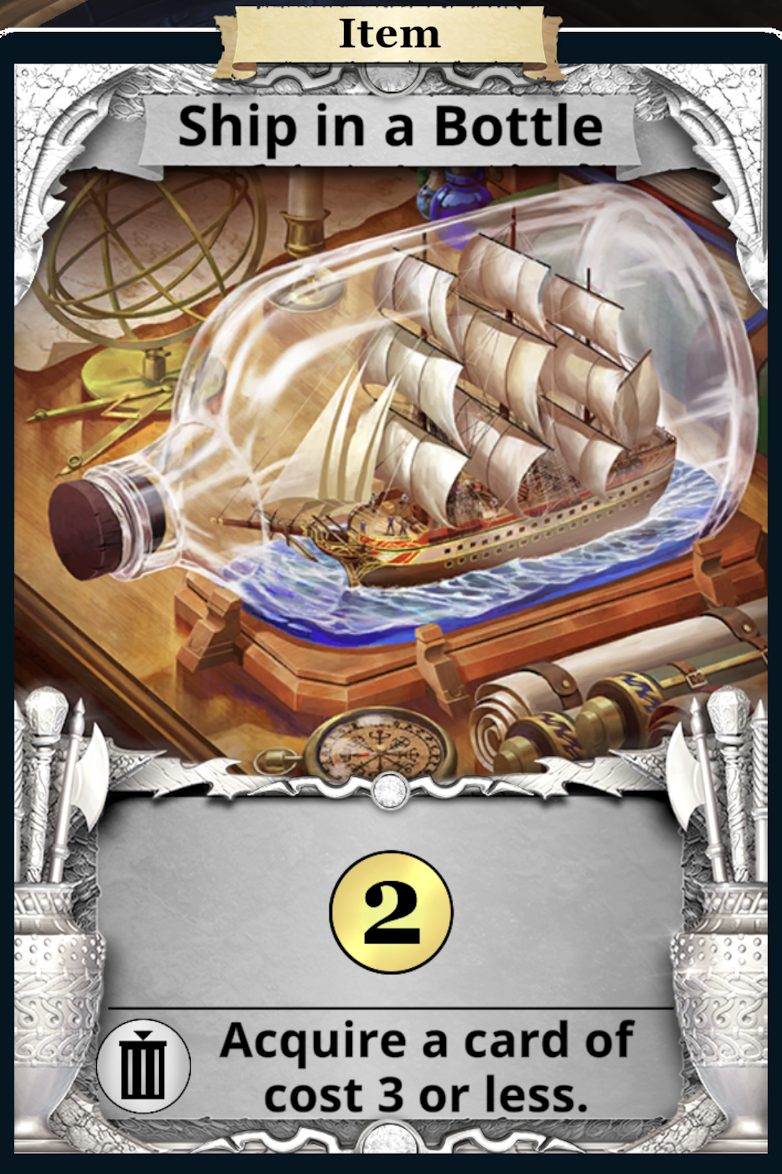
Finally, let’s take a look at the Level 14 Wizard upgrades from the Call to Arms expansion (note that these images are for the beta version, and are subject to change. First up is the Ship in a Bottle (SiaB):
The Ship in a Bottle is an amazingly powerful card. With this single treasure upgrade, you can purchase up to FIVE gold worth of cards! This is absolutely fantastic in the early game, and can help the wizard to really go off for some major purchases in the first or second turn of the game.
If the wizard can combo the SiaB with the Silverskull Amulet and or the Alchemist stone, you can afford virtually any card in the game, or buy a slew of mid-cost cards that can saturate your deck with actions that the wizard loves so much. There’s not much else to be said about this upgrade except that it offers a MASSIVE econ boost to the Level 13 wizard!
Your other treasure upgrade choice at Level 13 is the Treasure Map:

As you can see, the current configuration of the Treasure Map is relatively weak when compared to SiaB. Although the faction versatility offered by the Map is nice, it lacks punch until you can populate your deck with faction cards that can take advantage of the sacrifice ability. This means that the Treasure Map is useless in the early game, a critical time when the the wizard needs to do everything possible to gain the advantage…
When reaching Level 14, the wizard has a chance to gain another HP upgrade (which is highly recommended), or further develop their 2nd fireball as a tool to help whittle away at their opponents.
Choose your Level 13 and 14 upgrades wisely to round out your wizard build!
Be an Alert Wizard
Piloting the wizard well requires players to keep a close watch on the ever-changing game state, and be ready to pounce at the chance for a timely reshuffle, combo setup, fireball, or purchase that can help swing the game.
Are there any strategies that I’ve missed? Send me a message in our Discord and let me know, and I will continue to improve the information in this guide over time.

Title: The Wonderful World of Wizardry
Category: Characters
Tags: #Classes, #Jigmelingpa, #Strats, #Wizard
Published on: February 12, 2023
When not bottom-decking Fire Bomb and Domination as an avid Hero Realms player, Jigmelingpa is a weapon of mass instruction otherwise known as Matthew Rooks. A university educator based in Japan, he spends his time enjoying linguistics, games, nature, basketball, movies, music, and eats. He also sometimes plays Hero Realms a little.