Introduction
Welcome to my Breastplate Cleric guide. In this article, I will be going through some techniques I regularly use when playing Cleric. I currently only play one Cleric build, and most of the topics I’m writing about are specific to this build.
All functional parts of the build come together at level 9, when the final combo piece, the breastplate itself gets added. So, while this is written from perspective of level 12 character, everything in this article should be applicable from level 9 to 12. This build is probably at its strongest at level 9, since all other classes are still missing some of their important build pieces.
Build Components
Shining Breastplate
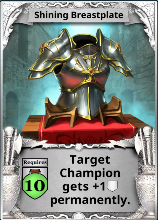
The most important piece in this build is Shining Breastplate. This allows you to permanently buff your champions.
By stacking the defence buff on their champions, Breastplate Clerics can transform their champions into the most powerful in the game.
Everburning Candle
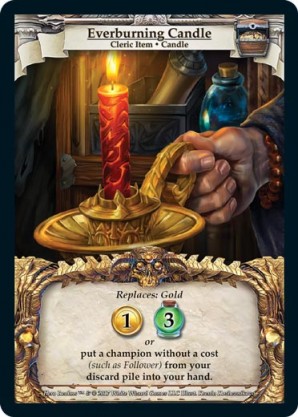
This is the other mandatory piece in this build. The Candle allows you to return buffed Followers from your discard pile into play, giving you more potential targets to buff with your Shining Breastplate, reducing chances of the Breastplate ability going to waste, especially early game.
You only have two Champions in your starting deck, which means there are turns when you don’t have one in your hand, especially early game. If you have the Candle in hand, you can fetch a Follower and give the Breastplate buff to it.
Brightstar Shield
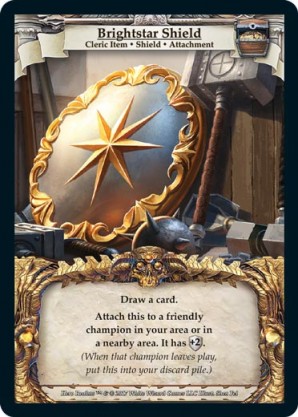
Brightstar Shield allows you to manipulate defence values of your champions. This can be a powerful utility tool for many situations, and since it draws a replacement card when played, it is never in your way.
This build could be played without Brightstar Shield, but I don’t see what the Redeemed Ruinos has to offer for this build. The opponent will not kill the Ruinos, and as a result you will gain 2 health each turn. I find that quite useless, since I usually manage to stabilize my health by filling the board with champions anyway. Perhaps Ruinos could be used as a matchup specific option against a Wizard to boost your HP.
Bless of Steel
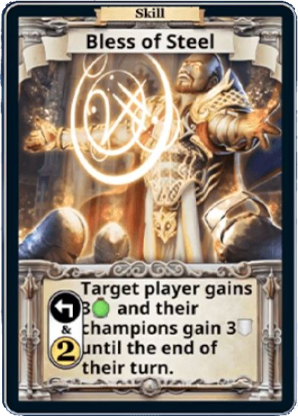
I find myself overhealing a lot when I play cleric. I don’t see much reason to invest my ability points on healing, so I invest everything into +3 Champion buff. Later in the game I typically activate the bless every turn, and every Champion in my deck turns into a reasonably strong card, especially when combined with the Breastplate buffs.
Divine Resurrect and Minor Resurrect
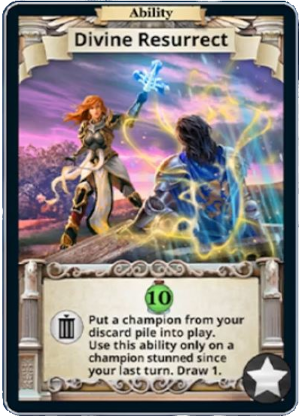
The resurrect abilities allow you to return your buffed Champions back to the game, getting more value out of them. You could probably use any Resurrect with this build, but I ended up choosing Divine Resurrect, because I usually only buff one or two Champions, so multi-targeting becomes less appealing. The extra draw can sometimes be vital, for example when contesting an important purchase.
The healing provided by Divine Resurrect can be important against some more aggressive builds. If you decide to choose another Resurrect option, you might want to add healing somewhere else in the build.
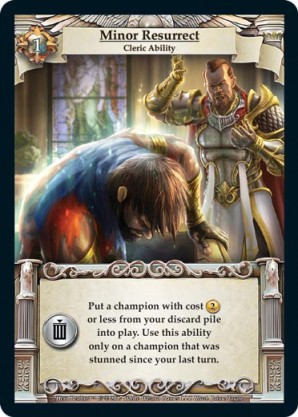
Taking Minor Resurrect at level 12 seems obvious to me. At the very least, you can resurrect a Follower when your board is empty, and get an extra use of Shining Breastplate while also saving some health, or use the Minor Resurrect to fish out a follower from your discard before an early reshuffle to improve your economy in the early game. At the best, you can use it to protect an important non-Guard or activate an ally ability. In each of these scenarios, I see Minor Resurrection being more valuable than the max health alternative.
Hammer of Light
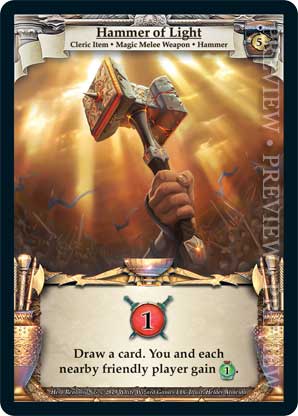
This is the final item in the build, and it is quite unimpressive. It does not have any particular synergy with the rest of the build.
However, it produces one additional point of combat every once in a while. Sometimes it can be important for clearing opponent Champions. Sometimes you can use the draw in combination with Varrick or Rasmus to setup nice combos. These are the reasons why I prefer it to Talisman of Renewal. But most of the time the Hammer ends up being somewhat mediocre card.
Game Plan
Your victory conditions
The typical victory condition for this build is Champion runaway. This means adding more Champions to the board than the opponent is able to remove. When they stick on the board, Champions will quickly generate an immense amount of value and overwhelm your opponent.
In some rare cases it might be possible to beat your opponent down with combat. This usually happens when you end up hate-buying lots of aggressive cards in Wizard or Thief matchups. You can keep your eyes open for this, but it is not the default victory condition you should aim for.
Opponents victory conditions
For your opponent, there are usually two possible routes to victory. First is trying to create their own Champion runaway condition. While Cleric is good at protecting their own board, they are not particularly good at clearing their opponent’s Champions due to their low damage output early game. When you see your opponent buying Champions, it is mandatory that you invest in cards that you can use to clear their board.
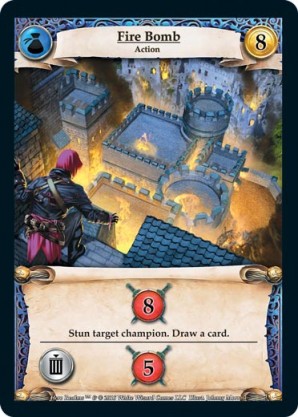
Another thing they could try is midrange timing. They build up economy and build high-impact combat cards such as Fire Bomb, Wolf Form and Life Drain. Somewhere around turn 20 the pressure from these cards becomes unbearable and your champion wall collapses. To defend against this attack, you need to build an economy of your own, and contest the most important purchases.
Role of Sacrifice cards
Early sacrifice is typically very strong in Hero Realms, and this build is no exception. If your opponent gets early sacrifice, you need to make something happen: if you wait until turn 30, your opponent will have thinned their deck and will win the game. In this case, aim for your own victory condition earlier than usual, so that the game is decided before the sacrifice takes full effect.
If you get early sacrifice and the opponent does not, the same rule still applies. You just need to keep your life total up and opponents board in check, and you are on your way to victory.
Finally, if your opponent gets more sacrifice cards than you, filter cards such as Rampage can help you temporarily outpace them.
Evaluating the Market
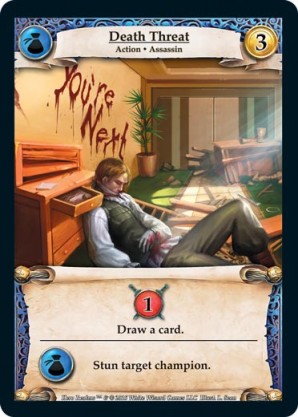
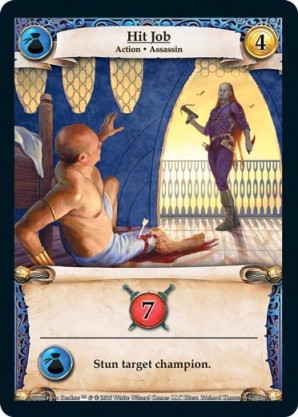
Direct stun effects
Cards that have direct stun effects are very good for your opponent. Breastplate build tends to create champions with 10+ defence, and as a result the direct stun cards can be worth ludicrous amounts of combat. When these appear in the market, you should target them to prevent your opponent from gaining the valuable effect.
Healing Effects
In slower matchups such as Cleric mirror or against a Lift Thief, cards with healing effects are not nearly as good as they usually are. You are not in a good position to pressure your opponent, and you have built-in healing options such as Bless of Steel or Prayer Beads you would like to use rather than buy healing from the market.
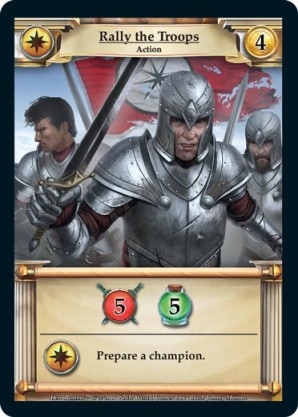
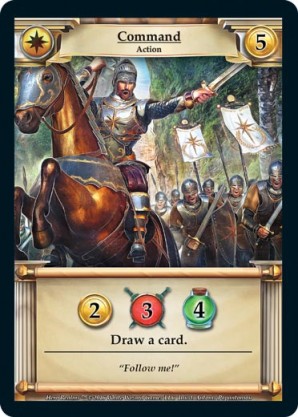
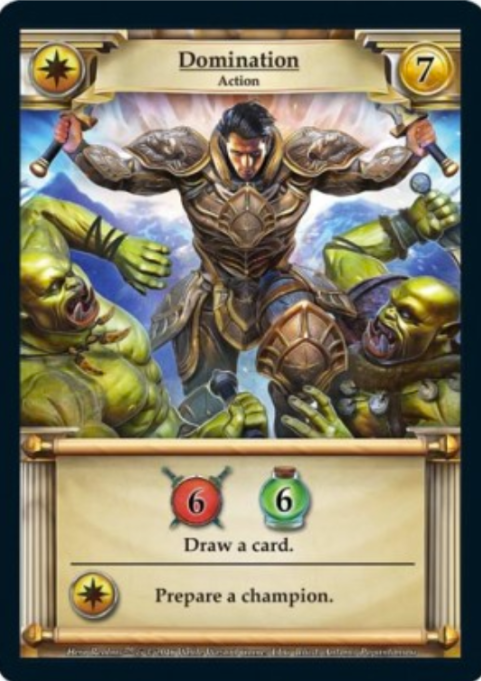
As a result, cards such as Command and Domination that are top cards in other matchups are not as high priority there. That said, the “Prepare a champion” effect on Rally the Troops and Domination can be a devastating combo for a cleric with strong champions.
Non-Guards
All non-Guards are more valuable than when playing other builds, because you can hide them behind your buffed Followers to keep them on the board.
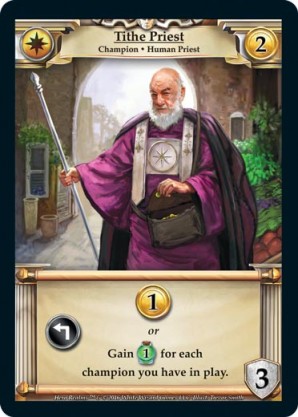
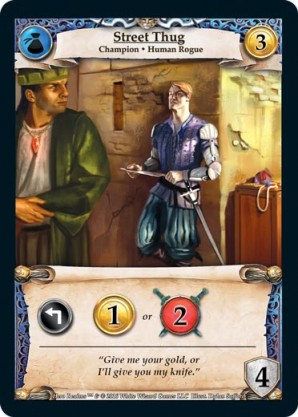
Cards like Street Thug or Tithe Priest become decent economy engines when they stay on the board for multiple turns. Later in the game, they become less of a burden than action-based economy cards, because they won’t clutter your deck when they are hanging on the board. Because of these reasons, I suggest that you should prioritize Street Thugs and Tithe Priests over Taxations, Profits, or Recruits for your deck.
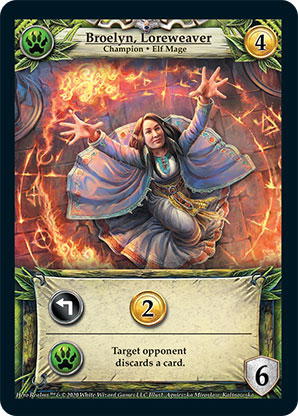
More expensive non-Guards such as Broelyn, Kraka, Krythos, or Rake are even more powerful, because they enjoy protection from the Followers while having more impactful effects.
Don’t clutter your deck
This applies to all classes in Hero Realms, but I want to have a reminder here, because its important: weak early game cards come with a price.
With Breastplate, your Champions can become strongest cards in the game. You do not want to be drawing your Taxations, Blackmails, or Profits when you could be drawing these:
Instead, try to build your economy using cards that don’t clutter your deck later in the game. The easiest way for this is using gold generating Champions, but the economy they provide can be a little underwhelming. Self-sacrificing card are good choices because they can be easily removed when they become a burden. Other light options include cards like Elven Gift and Dark Reward.
Priority purchases
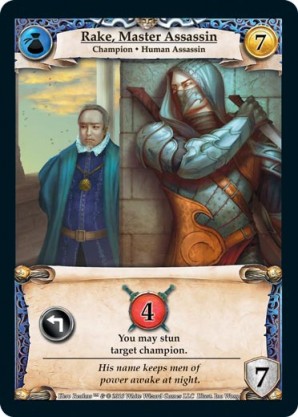
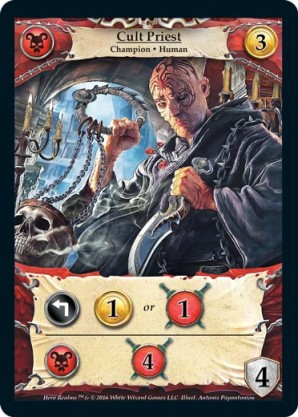
I consider Rake the most important card in the market deck. There are three reasons for this. Rake is non-Guard so they can hide behind your Guards and generate value. Rake is high-health Champion, so they contribute well to your Champion runaway. Rake also has direct stun effect, so if your opponent gets Rake, they can use it to clean up your board very effectively.
Varrick is a very powerful utility tool. They can get your buffed high-value Champions back on the board. When you draw a Follower, you can buy yourself a non-Guard and use Varrick to topdeck it so that it can immediately start being protected and generating value. Varrick itself is also a non-Guard, so they benefit from the protection of Followers and other Guards as well.
Krythos is the only non-Guard Champion with sacrifice ability. Sacrifice effect quickly combos with itself, so making the Krythos stay even one extra turn can have a large impact.
Buffing with Breastplate
Guard vs. non-Guards
When choosing targets for the Breastplate buff, you want to choose your target so that the maximum amount of your champions would stay on the board for the maximum amount of time. Lets start with a simple scenario:
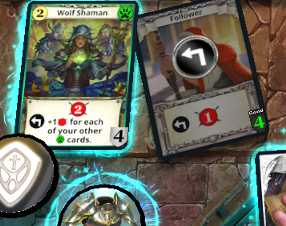
If we choose to buff Wolf Shaman, our opponent will need 4 combat to remove Follower and 9 total damage to remove Wolf Shaman.
If we choose to buff Follower, our opponent will need 5 combat to remove Follower and still need 9 total damage to remove Wolf Shaman.
We can see that no matter how much combat our opponent has, it is always best to give the buff to Follower, because its a Guard and defends Wolf Shaman with its defence.
This kind of situation happens in games all the time. With this example I wanted to show that it is often better to buff your Guards rather than buffing non-Guards.
Followers vs. Non-Followers
Next we need to choose which Guards to buff. This question is a little trickier. The Guards don’t protect each other and all Guards are equally good at protecting the non-Guards.
The first idea that comes to mind would be to buff the Champion that has the most powerful expend ability to protect it. It turns out that the extra defence does not necessarily serve to protect the Champion. I will further demonstrate this in Chapter 6 -> Breaking the Symmetry.
Instead, I suggest that you prioritize buffing your Followers. They have a helpful quality that no other Champion has: they are Candleable. Each time Everburning Candle returns your Follower into play, your opponent has to stun it again. When they do, they are wasting 1 additional combat for each Breastplate stack on that Follower. By attaching the stacks to the Followers, the Candle starts generating large amounts of value. Follower can also be targeted with Minor Resurrect, which is a nice bonus.
Because this, I usually don’t value buying Guards very highly. I don’t want to give them Breastplate buff, and they can’t be protected by my Followers. A card like Torgen is still good, but it does not get very much extra benefit from the Breastplate.
Tall vs. Wide
When building your board of Champions, there are two main shapes to build towards: Tall and Wide. You should always be aware what cards your opponent has left in their draw pile, and plan your defence accordingly. Additionally you should consider Resurrection opportunities, opponents direct stun cards, and the general level of combat and economy in the game when choosing which one to aim for.
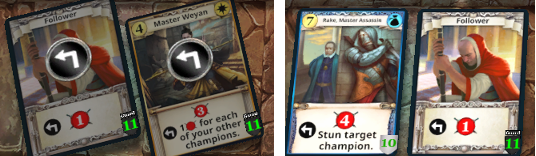
Tall
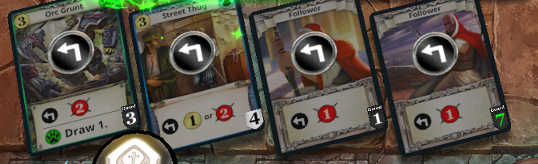
The picture above shows a board that has been built into the tall shape. All breastplate stacks are given to a single Follower, and other Guards have none. This shape is particularly effective early on, when the opponent stuns all your Champions every turn. The idea behind the shape is that when you use Resurrection or Everburning Candle, you can return all your Breastplate stacks to the board at once. That way opponent is wasting maximum amount of combat when they have to stun that Champion again.
You should also notice that in the picture above, if opponent has 5-10 combat dureing their next turn, all but 4 combat will go to waste. Building this way maximizes that amount and window.
Direct stun effects are particularly strong against tall boards, as that allows them to get maximum value out of the stun. When an opponent buys a direct stun card, you should abandon tall shape and start distributing the stacks more evenly.
Tall boards are particularly effective against wizards, because they are more resistant to Fireball. If they are running Explosive Fireball, you can also consider buffing your champions above 5 health to prevent them from being discarded.
Wide
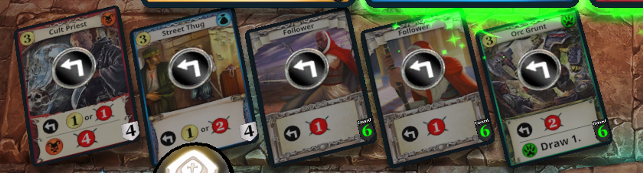
The picture above shows a board that has been built into wide shape. Stacks have been divided so that all Guards have equal defence value. This build is particularly effective once you start stabilizing your board. The idea behind this shape is that because it is symmetrical, it limits opponents options and causes them to waste maximum amount of combat.
In the image, any combat amount that is 5 or less gets wasted. If the opponent has 7-11 combat, all but 6 combat will get wasted. Finally, if they have 13-17 combat, all but 12 combat will get wasted. Any other values can be used optimally.
We’ll compare this to this image:
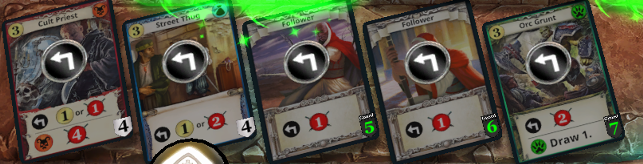
Here any combat amount that is 4 or less gets wasted. If opponent has 8-10 combat, all but 7 combat will get wasted. This is smaller range and also smaller amount than the symmetrical alternative. Similar thing happens at 14-17 combat: the opponent is able to use one additional combat when compared to symmetric alternative.
I usually build Wide boards very early against Rangers with Snapshot. That way, I take minimum damage from the Snapshots direct stun effect.
Brightstar Shield
Brightstar Shield plays major role when aiming at different shapes. Breastplate stacks stay forever on the Champion, but Brightstar Shield is unattached when the Champion is stunned. This means that you can use Brightstar Shield more freely when optimizing your defence for opponents next turn. With Breastplate, you should plan more long-term.
The magnitude of Brightstar Shield is also +2, which equals two Breastplate stacks. Brightstar Shield makes changing between Tall and Wide shapes surprisingly easy.
Similarly to Breastplate, you usually want to give your Brightstar Shield to your guards, because they also protect your non-Guards. Additionally, if the Guard gets stunned, the Shield will also go to shuffle.
Breaking the Symmetry
Sometimes you are in a situation where all your Guards have same amount of defence and your Breastplate is still unused. Counterintuitively, you would like to give your stacks to the Champion that is the worst target for your opponent. I’ll give you the following example to demonstrate this.
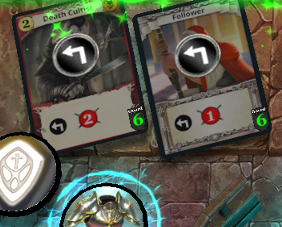
Here, you have two Guards in play: Follower and Death Cultist. You would like to defend your Death Cultist in the best possible way, because it produces more combat than the Follower, and might also activate necros ally abilities.
In this scenario, we give Breastplate buff to the Death Cultist. Now, if our opponent gets 6 or less combat on their turn, they won’t be able to stun the Cultist. If they have 7 or more, they have no problems stunning the Cultist.
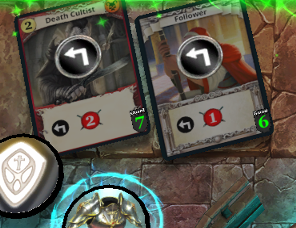
In this scenario, we give Breastplate buff to the Follower. If our opponent gets 5 or less combat, they won’t be able to stun the Cultist. Additionally, if our opponent has 7-12 combat, they have to choose between stunning the Cultist or wasting an additional point of combat. They might still stun it, but then you are in a better board position next turn than in the other example. This usually protects the Cultist better than the direct defence boost.
The weak point of this solution is our opponent getting exactly 6 combat. Luckily, you can easily check their deck and estimate how likely that is. If its not happening, this alternative is always the better option. If it is likely, make an exception and buff the Cultist.
Discard Effects
Finally, I value discard effects highly against Thief, because they combine well with their hero power. In late game, discard can easily force you to choose between discarding a Champion and omitting Bless of Steel. Discard is also very helpful vs. other clerics, who will be forced to discard highly valuable champions late game when you hit them with the discard effect.
If there are a large amount of discard effects, you might need to buy them against other classes as well to stop them from getting critical mass of discard cards.
That is all I have to say on the Breastplate Cleric for now. Thanks for reading. Also, thanks to Nudeltulpe and Jigmelingpa for some useful feedback and suggestions.
Title: Sticky Followers – Userkaffe’s Breastplate Cleric Guide
Category: Characters
Tags:
Published on: October 27, 2022