Master of the Shadows (Part 1) – Finding your identity
Welcome to Master of the Shadows! This will be a series of articles regarding the Thief class in the deck-building game Hero Realms created by Wise Wizard Games. We will discuss the Thief basics, Thief gameplay (Hyperlinked to article), and my suggestions for how to handle decision-making when playing the Thief (Hyperlinked to article). S_Freak has created a nice Overview of Thief, but this Series is designed to dig a little deeper. Most of our discussion will be presented towards the current beta digital version of Hero Realms. All this knowledge is applicable to the physical card game as well, but expansions and set combinations are required. Knowing that, let’s get started.
First off, let’s go over the base Thief deck.
- 5x 1 gold
- 3x Throwing Knives (1 damage + 2 damage for each other knife in play)
- 2x Ruby (2 gold)
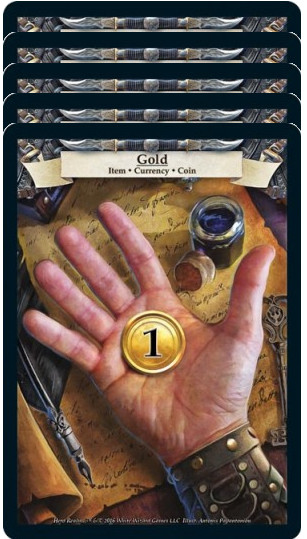
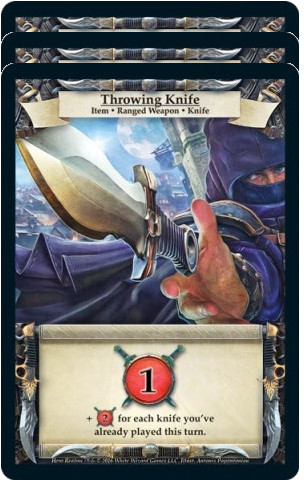
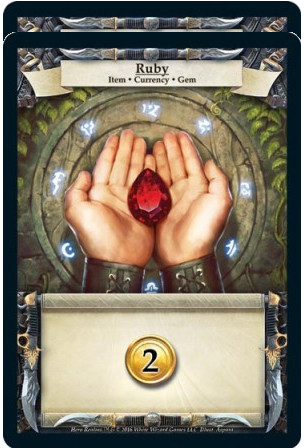
This starts us off with 9 gold and a range of 3-9 damage in our starting deck. The 9 gold is the highest starting gold of all classes and none of it is conditional. As for damage, the only real “advantage” is that if we combo our daggers, they gain increased damage for each other dagger already played. This means that in theory, we could do a max of 9 damage (although this can be increased to 11 with the Keen Throwing Knife upgrade). This doesn’t happen very often and the chances reduce with every card purchased from the market.
The thief also has an exhaustible ability (Pickpocket) and a once per game ability (Heist). These can be leveled up over the course of time.
Leveling Up and Upgrades
You start off at level 1 with each class and grow in power as your character levels up. Each level allows for specific upgrades, most of which give you options to choose from. The upgrades at 2 and 3 are automatic, but every other one after that has at least 2 options to choose from. Below is an outline of the upgrades that you will receive at each level.
| Level | Upgrade |
| 1 | Character starts with Pilfer (Acquire an item of 2g or less for free.) |
| 2 | Pilfer upgrades to Theft (Acquire a card of 2g or less for free.) |
| 3 | Minor Heist upgrades to Heist (See further upgrades below) |
| 4 | Upgrade one - Pickpocket/Heist/Health |
| 5 | Item Upgrade (Ruin of Thandar Expansion) – Enchanted Garrote or Keen Throwing Knife |
| 6 | Upgrade one - Pickpocket/Heist/Health |
| 7 | Item Upgrade (Ruin of Thandar Expansion) – Sacrificial Dagger or Knife Belt |
| 8 | Upgrade one - Pickpocket/Heist/Health |
| 9 | Armor Upgrade (Lost Village Expansion) – Shadow Mask or Silent Boots |
| 10 | Upgrade one - Pickpocket/Heist/Health |
| 11 | Item Upgrade (Lost Village Expansion) – Blackjack or Jeweler's Loupe |
| 12 | Upgrade one - Pickpocket/Heist/Health |
There are a lot of choices here, all of which dictate what playstyle your Thief will take on. I highly recommend leveling at least 2 Thieves to learn multiple playstyles and find out what works better and is more fun for you. I’ll make some general recommendations throughout this article but in a later article, I’ll lay out and explain my favorite combinations. For now, let’s go over our upgrades.
Pickpocket
| Level | Exhaustible Skill |
| Tier 1 | Pickpocket – Target player gains 3 health and target opponent discards a card. |
| Tier 2 (Left) | Sleight of Hand – Target player gains 3 health and target opponent discards a card. If that card has no cost, gain 1g. |
| Tier 2 (Right) | Swipe – Target player gains 5 health and target opponent discards a card. |
| Tier 3 (Left) | Misdirection – Target player gains 3 health and target opponent discards a card. If that card has no cost, gain 2g. |
| Tier 3 (Center) | Distracted Exchange – Target player gains 5 health and target opponent discards a card. If that card has no cost, gain 1g. |
| Tier 3 (Right) | Lift – Target player gains 7 health and target opponent discards a card. |
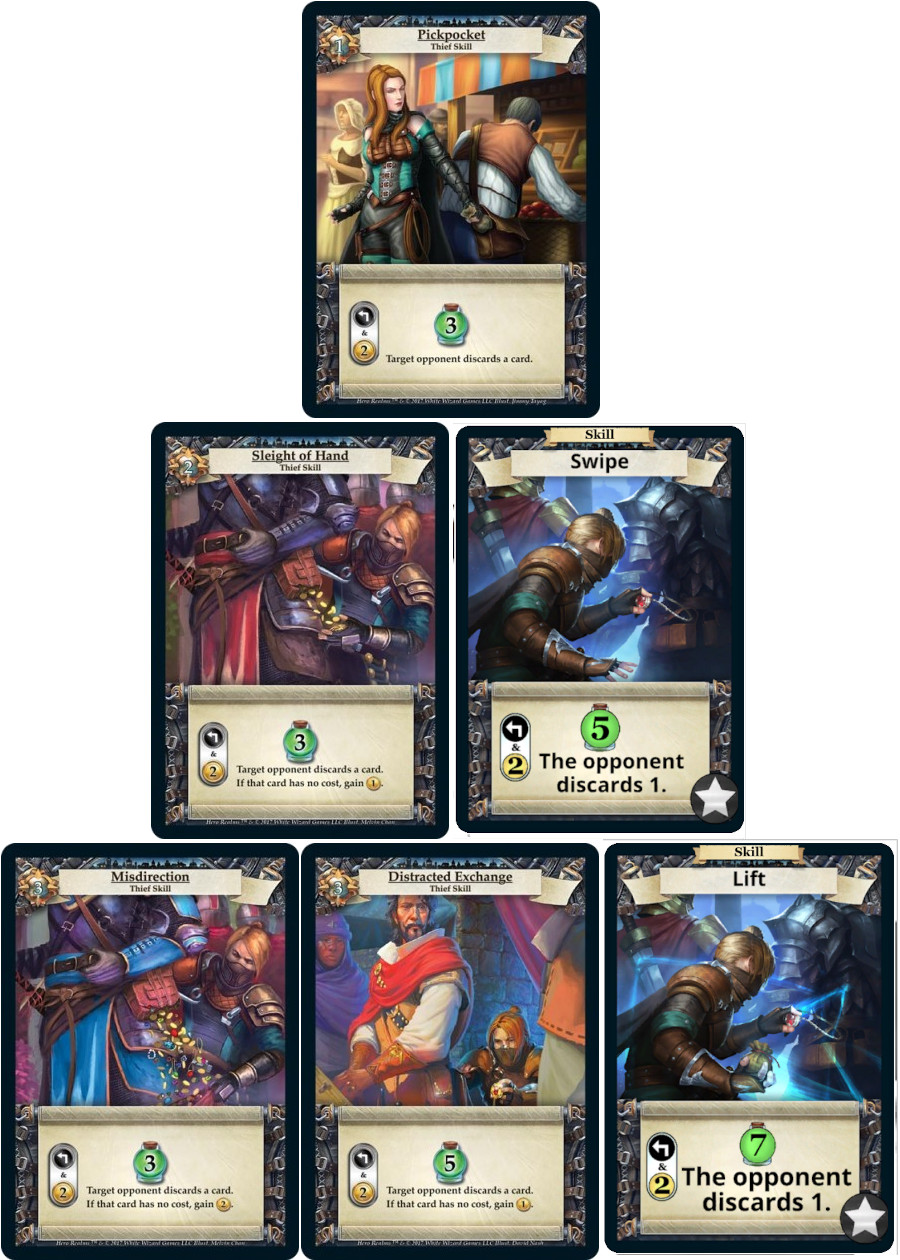
You start off with “Pickpocket” levels 1-3 and may choose to upgrade from level 4 onwards.
The left side of this tree focuses on gaining economy advantage, and the right side focuses on health gain and sustaining into the late game. The choice of which tree to choose mostly relies on your playstyle.
If you like the idea of gaining extra economy early and playing a slightly more aggressive style of play, then misdirection may be for you. Since it doesn’t heal for very much, this build doesn’t push into late game very often. It uses economy advantage to develop a strong deck faster, but does not sustain as well as the other options.
Lift is the choice if your playstyle frequently pushes you into longer games, as it allows for the most amount of sustain.
Distracted Exchange is a very nice middle ground as it provides some economy advantage while also giving you a boost to health gain on each use. It’s typically the safer and more flexible of all the options.
Heist
| Level | Once Per Game Ability |
| Tier 1 | Heist – This turn, you may acquire a card of cost 1g or more from an opponent’s discard pile by paying its cost. You may not use this ability on your first or second turn. |
| Tier 2 (Left) | Timely Heist – The next time you acquire a card this turn, you may acquire another card of the same faction and of equal or lesser value for free. If the second card costs 3g or less, put it into your hand. |
| Tier 2 (Right) | Skillful Heist – This turn, you may acquire a card of cost 1g or more from an opponent’s discard pile by paying its cost. You may also acquire a card from the market row of cost 3g or less for free. You may not use this ability on your first or second turn. |
| Tier 3 (Left) | Practiced Heist - The next time you acquire a card this turn, you may acquire another card of the same faction and of equal or lesser value for free. Put the second card into your hand. |
| Tier 3 (Center) | Smooth Heist – The next time you acquire a card this turn, you may acquire another card of equal or lesser value for free. Put cards of cost 3g or less acquired in this way into your hand. |
| Tier 3 (Right) | Masterful Heist – This turn, you may acquire a card of cost 1g or more from an opponent’s discard pile by paying its cost. You may also acquire a card from the market row of cost 5g or less for free. You may not use this ability on your first or second turn. |
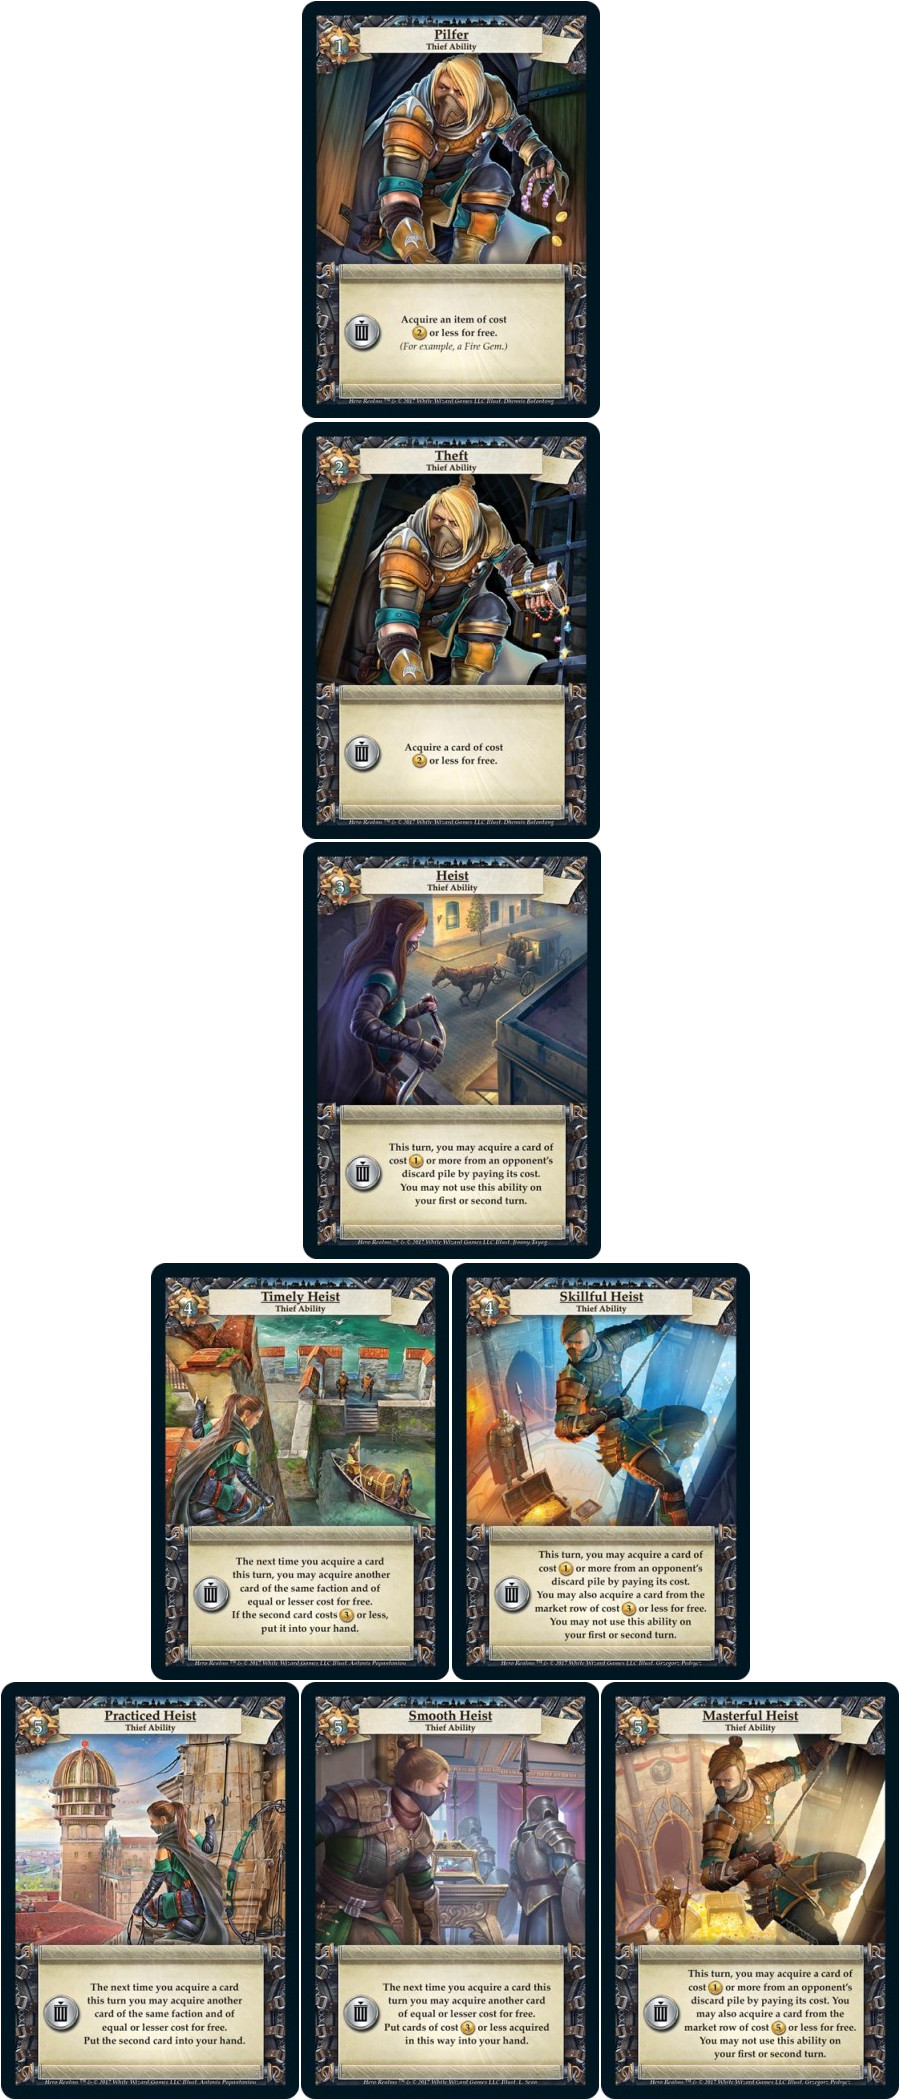
You’ll notice in the graphic that there is a “Pilfer” and “Theft” ability. These are available at levels 1 and 2, and upgrade to “Heist” at level 3. No choices to be made there.
Both sides of this tree are very market and/or discard pile-dependent. Either the market/discard pile is kind to you, allowing your Heist to give you an extreme advantage early game against your opponent, or it’s not so kind and you are starting off with a disadvantage or a rather awkward start.
Practiced Heist has the most risk, but most reward. If your hand and the market allow for a big purchase with a matching faction card in the market, then putting a card of high value directly into your hand early can set you so far in advantage that your opponent may never catch up. But on the other hand, if this doesn’t line up, you are now waiting for multiple turns or shuffles before you can use this ability.
On the other side of the tree, you have Masterful Heist. This ability is designed to not only improve your deck quickly, but also interfere with your opponent’s plan after both players have taken two turns. You have the option to take a pivotal card from your opponent while grabbing up to a 5g cost card for free! The problem with this option is that it can too often miss in early turns where your opponent immediately shuffles the card that you wanted to steal, or the turn that it’s sitting in the discard pile, you don’t have enough gold to buy it. Some classes like wizard and ranger can also employ tactics to keep high value targets out of their discard pile, thwarting the Masterful Heist. It’s wonderful when it works, but sometimes you end up being on turn 10 or later before you can Heist, or in a worst-case scenario, you may finish the game without ever having a chance to use it on a meaningful target.
Smooth Heist is in the middle. This option is effectively the same as Practiced Heist but much more flexible. You also have the option of heisting any 3g or less cards directly to hand, which means you can possibly heist two 3g or less cards and immediately add both to your hand. This can be an incredible way to start off your first or second hand with a lot of damage, a small wall of guards, bonus economy to buy more cards right off the bat, or even force your opponent to start discarding multiple cards from turn one if you luck into sparks/curses. This is typically your safest option of the three.
Health Upgrade
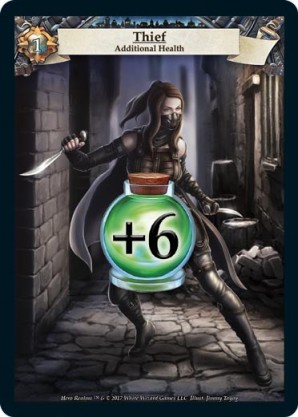
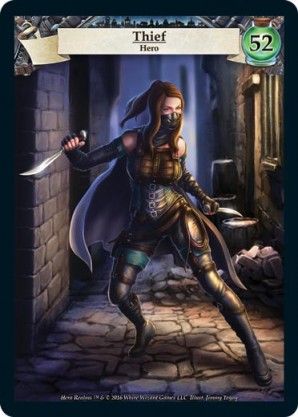
The thief starts off with 52 Health (the highest being fighter at 60 and the lowest being wizard at 50). The option to upgrade your health by +6 is available as early as the other ability upgrades. In my opinion, it is the least effective of all the upgrades, but may be worth picking up at 12. The 6 health could give you that extra time to help turn the tide. This is most helpful when playing against aggressive players, and may be worth it depending upon how you build your character.
Ruin of Thandar Item Upgrades
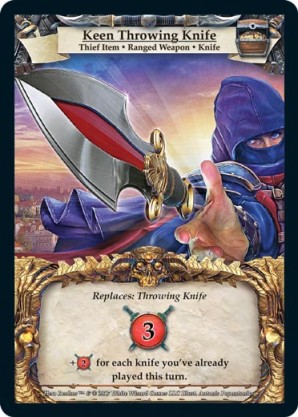

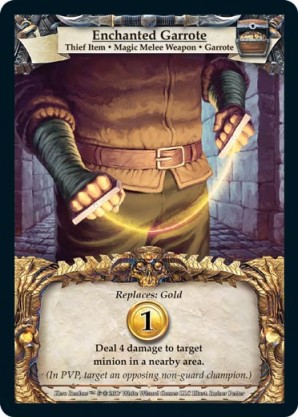
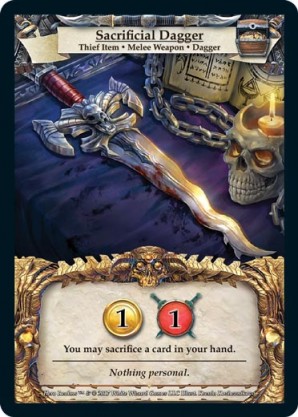
At Level 5, you are offered either Keen Throwing Knife or Enchanted Garrote, both replace options in your starting deck. At level 7, you are offered either Sacrificial Dagger or Knife belt, both of which are directly added to your starting deck. None of the item upgrades are necessarily bad, but I believe that Keen Throwing Knife pairs best with Knife Belt, and Enchanted Garrote pairs best with Sacrificial Dagger. I’ll explain why below.
Pairing A – Keen Throwing Knife (Level 5) and Knife Belt (Level 7)
- These two pair very well in that they are both very consistent options that can be effective throughout the entire game.
- In a vacuum, the Keen Throwing Knife is better than Enchanted Garrote in that it’s an unconditional +2 damage to your base deck. This can help your deck be either more aggressive or help push over any champions in the early game to give you more control and time to get into late game.
- Knife Belt does require the presence of at least 1 knife to be effective, but this happens very frequently in early game and sometimes you even have 2 or 3 knives in hand to draw even more cards! This allows you to have more damage or more economy early game to either be more aggressive or be able to buy more powerful cards for your late game.
Pairing B – Enchanted Garrote (Level 5) and Sacrificial Dagger (Level 7)
- These two pair well together when looking to sacrifice your early game play for a more aggressive mid-game. This combination is best used against late-game oriented deck builds.
- Since Sacrificial Dagger will frequently look to sacrifice a 1g or dagger out of your hand, you would rather have the bonus damage from Enchanted Garrote to keep control of the board and be less reliant on damage from daggers. This is weak to high health guards so be careful of a Fighter’s upgraded Shield Bearer or High health guards purchased early on.
- Sacrificial Dagger’s job is to accelerate the average strength of your draws faster by getting rid of base deck cards early. This does weaken your early game play substantially, but you can form a well-built deck much faster than your opponent.
Lost Village Armor Upgrades
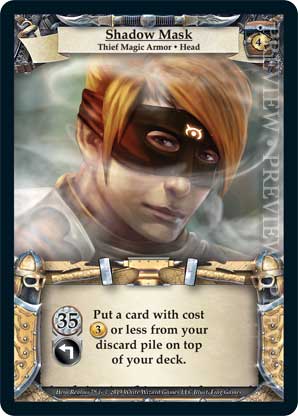
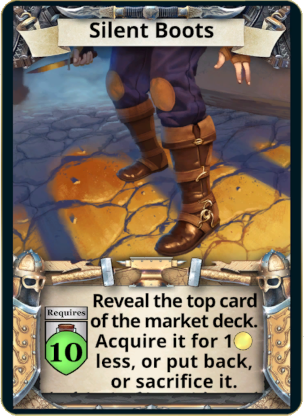
At level 9, you get to choose between two upgrades, Shadow Mask and Silent Boots. Both options are equally viable depending on your strategy.
Shadow Mask is the more consistent option of the two, especially if your ability choice helps you stay above the 35-health requirement. Being able to control the next card you draw can help guide your deck to be more aggressive (i.e. recycling an Elven Gift multiple times before shuffling) or accelerate your deck building (i.e. Recycling 3g economy or sacrifice cards). Its weakness comes in its high health threshold requirement. 35 Hp is only 17 off your starting health, so if your opponent gets the jump on you with early damage, you can lose this advantage quickly.
The Silent Boots upgrade is unique in that it’s the only ability in the game that can manipulate and override the market row. This may seem luck dependent if you are thinking solely in its ability to improve your deck, but if you look at its ability to control what kind of cards fall into the market, by mid-game you can flood the market with mediocre cards, locking down your opponent’s ability to buy cards that are effective for their deck. In an aggressive matchup, you can also flood the market with high cost cards locking down your opponent from buying anything but fire gems since most aggressive decks don’t tend to buy extra economy early on. It’s a control oriented ability that requires a lot of thought, planning, and a little luck, but can be very effective if piloted appropriately.
Lost Village Item Upgrades
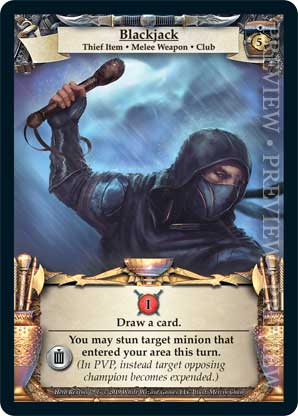
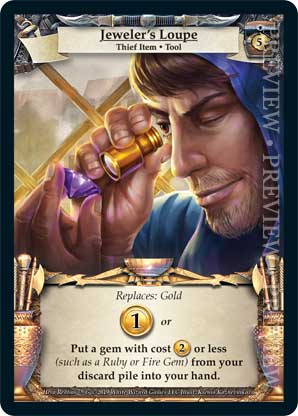
At level 11, you get to choose between two upgrades, Blackjack and Jeweler’s Loupe. Both options are equally viable depending on your strategy.
Blackjack is typically best paired with Shadow Mask (Level 9) and is added directly to your deck. It does not add any bloat since it draws a card to replace itself immediately. It effectively adds 1 damage to your deck and adds the ability to draw cards added to the top of your deck via Shadow Mask immediately. Adding a “draw a card” to your starting deck also combos well with Guild (Blue) market cards and Varrick. The Blackjack’s sacrifice ability shouldn’t be overlooked, as it can help out in a pinch if you need to expend a champion to go for lethal, or incapacitate a powerful champion that you don’t have enough damage to stun.
The Jeweler’s Loupe replaces a gold in your starting deck. It’s best paired with Silent Boots (Level 9) since Blackjack is borderline useless without Shadow Mask or other topdecking abilities. Loupe can add an additional 1g into your economy if you have a ruby in the discard pile. But it also can add 3 damage to your play if you need it and have 2g in hand already. If you need the damage to clear a champion or push for lethal, you can buy a fire gem, bring the fire gem to hand with Loupe, then sacrifice the gem for 3 extra damage! This doesn’t seem like a lot, but its flexibility in either adding economy or damage can be integral in different stages of the game.
Conclusion
There are a lot of good tools available for the Thief. The difficulty lies in organizing a deck that synergizes well and piloting it. But hopefully this will give you a good start in mastering the shadows!
Title: Master of the Shadows (Part 1) – Finding your identity
Category: Deckbuilding
Tags:
Published on: July 27, 2022
Alex Rogers AKA "DaKatSesMeow" is an avid player of tabletop and video games and loves to travel the world. No, he doesn't have any awards or accolades to prove his worth in Hero Realms. He just likes to play A LOT! He's a chiropractor and entrepreneur and has been happily married for 5 years. Challenge him anytime in the Hero Realms digital game to prove you're better than him! IGN: DaKatSesMeow